Advance Cloude Security

Cloud Security Explained: Protecting Data in the Cloud

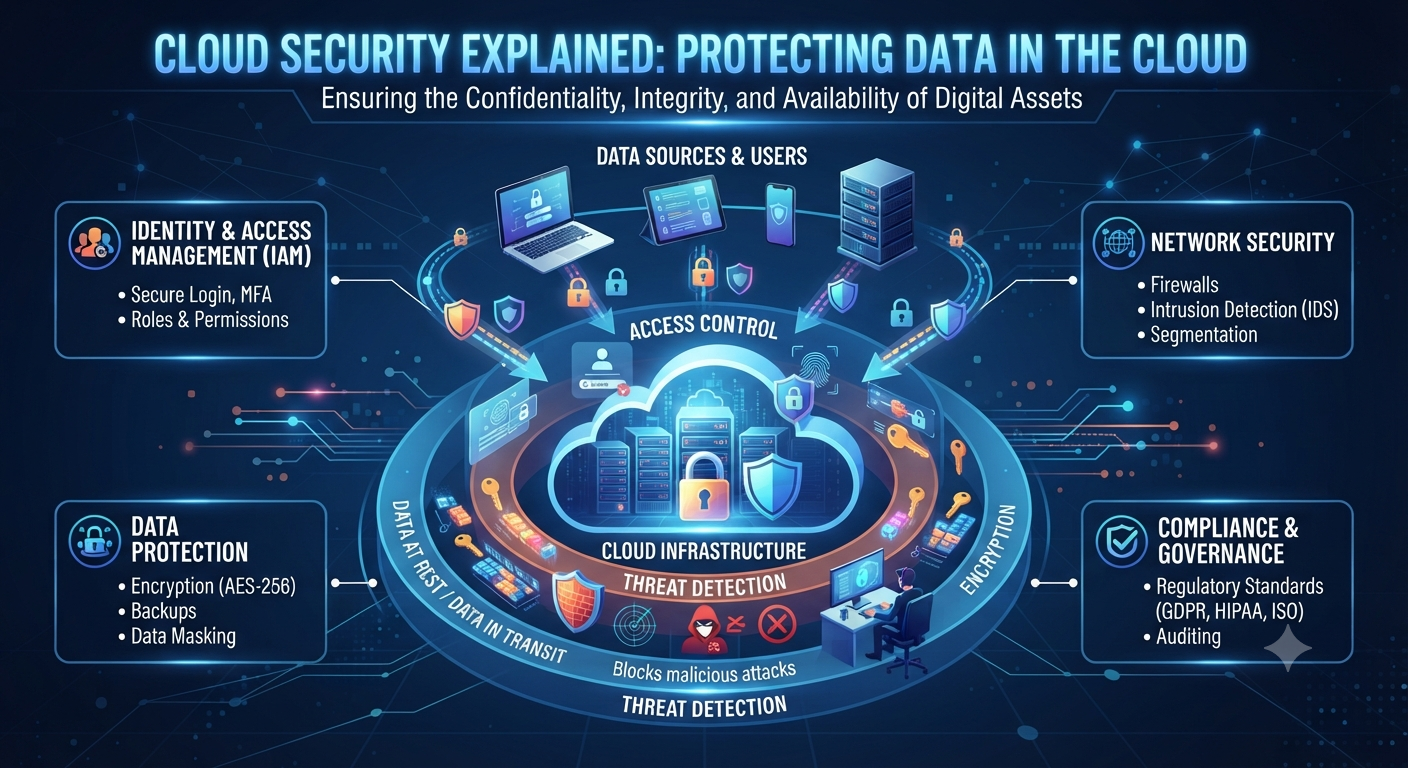
Cloud Security: The Ultimate Guide to Protecting Data in the Cloud Introduction to Cloud Security: Data Protection in the Cloud   The advent of cloud computing has revolutionized the ways in which organizations and consumers store, process, and retrieve data. Instead of buying physical servers at their offices or data centers, organizations can use cloud platforms to scale their infrastructure, run applications, store files and run databases with a couple of clicks. Its versatility has sped up the digital transformation of almost every industry, from banking to healthcare to education to e-commerce. With sensitive data moving into the cloud, protecting such data becomes increasing important. Cybercriminals are always on the lookout for vulnerabilities they can exploit to steal sensitive information, disrupt business processes or gain unauthorized access to cloud resources. One security breach, such as a weak password or misconfigured storage bucket, can result in the loss of thousands of customer records, and significant financial and reputational damage. Cloud Security is the set of technology, policies, procedures and best practices used to protect systems, applications, and data that reside in the cloud. This allows organizations to enjoy the benefits of cloud computing without compromising on availability, integrity or confidentiality. In this guide, we will delve into the fundamentals of cloud security in detail, offering practical advice and highlighting common threats to assist individuals and organizations in safeguarding their cloud environments. What Is Security of the Cloud?   Cloud security is a set of technologies and protocols that are used to secure cloud-based data, applications and infrastructure from cyber-attacks. It is a blend of technical controls, operational procedures and governance policies designed to protect business continuity and mitigate security risks. Unlike traditional IT environments, cloud security follows a shared responsibility model. The cloud service provider secures the infrastructure underneath but the customer is responsible for securing their own applications, user accounts, data and configurations. A company might, for instance, keep sensitive customer data on a cloud platform. The provider is responsible for the security of the network and physical servers that support the service. The organization is responsible, however, for making sure that sensitive data is encrypted, access privileges are appropriate, and user activity is monitored. The Significance of Cloud Security     Organizations are moving to cloud computing to save on costs and for flexibility and scalability. But these benefits also bring new security problems. What if a company doesn’t have enough security? Data leaks Burglary by unlawful entry Amount of financial loss Outage of Service Sanctions for regulatory violations Distrust the customers A good cloud security strategy helps organizations shrink their attack surface, quickly spot threats, and maintain compliance with industry regulations. What is the Shared Responsibility Model?     Knowing who is responsible for what is one of the most important aspects of cloud security. Cloud Providers’ Responsibilities The majority of cloud providers implement security protocols such as: The data center’s physical location The networking platform Hard Disk Drives Virtualization platforms Cloud services that are core Customer Responsibilities Customers are usually responsible for: User account management Identity and Access Management (IDAM) Encryption of data during OS installation Application security Surveillance security measures Disaster recovery and backup “The number one reason for cloud security incidents is the lack of clear roles and responsibilities.” Cloud Security Risks     Many cyber threats are amenable to cloud environments. Understanding those risks is the first step toward building good defenses. Loss of Data A data breach is when confidential information is accessed without authorisation. Attackers may use stolen credentials, weak passwords or misconfigured cloud storage to access sensitive data. For example: Consider an online retailer that accidentally exposes a cloud storage bucket to the public. Anyone with the right URL could see customers’ names, e-mail addresses and payment details. Cloud Resources Misconfiguration Misconfiguration is often the bane of cloud security. Some examples: Publicly accessible databases Storage buckets accessible to the public No limitations on firewall policies User rights are too lenient Even the largest of organizations have had security issues due to simple configuration mistakes. Weaknesses in Identity and Access Management (IAM) Attacker can exploit compromised accounts due to insufficient access control. Common issues: Weak Passwords Common administrator accounts Multi-factor authentication not supported Too much rights Users can be confident that they will only be granted the minimum access necessary to do their jobs. This is the least authority principle. Internal Threats External attackers don’t cause all security incidents. Employees, contractors or partners with the required access could unwittingly or maliciously disclose sensitive information. Consistent monitoring and tight access controls minimize insider threats. Ransomware and Malware     Attackers can use malware to gain control over systems connected to the cloud. Ransomware can encrypt business data and only restore access after payment. Having secure backups and endpoint protection greatly reduces the severity of ransomware attacks. Account Take Overs Credential stuffing, phishing, and password reuse are the most frequent ways cybercriminals attempt to compromise cloud accounts. Actions Taken by the Attacker on Entry: Theft of sensitive information Further assaults are launched Build hardware for crypto currency mining Delete the backups Conceal the admin accounts One of the best defenses against account hijacking is multi-factor authentication. Features of Cloud Security     “A good cloud security solution is not one product, it’s a combination of many layers of protection.” Identity and Access Mgmt (IAM) IAM provides users with the authority to access cloud resources and perform actions. The main characteristics are as follows: Username Role-based access control (RBAC) Authorization Management Multi-factor authentication (MFA) Single sign-on (SSO) Data Encryption Encryption is the process of securing data so that it cannot be read by those who do not have the correct encryption key. Organizations should implement encryption for: Data at rest Data in transit Files that are backups Databases By encrypting data, you greatly reduce the amount of data that can be exposed in a breach of a storage system. Security Network “Security controls like protection and segmentation are a must to secure cloud networks.”
Advance Cloude Security

Linux vs Windows: Key Differences Explained for Beginners

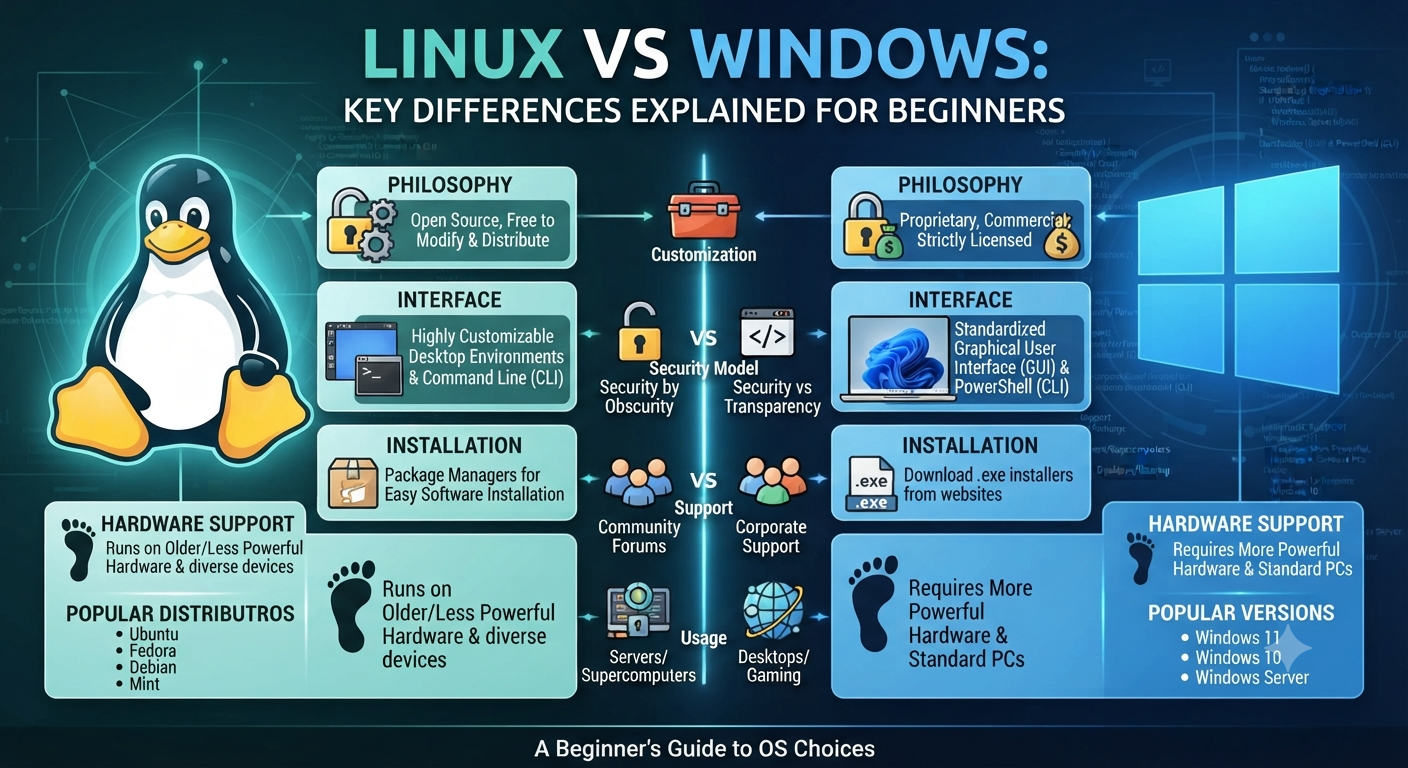
Linux vs Windows – The Differences Explained for Newbies   For those of you who have spent your whole computing life within Windows, hearing people talk about Linux can sound like they are talking about a whole different kind of tech. It is not. But the difference is real and matters if you are thinking of switching, learning IT or even just curious why so many servers, developers and security professionals prefer Linux. This guide will compare Linux and Windows in plain English. We’ll look at what each operating system actually is, compare costs, security, customization, and software support, and help you decide which one makes sense for what you want to do. What is Linux and What is Windows? But before we start a feature-by-feature comparison of Linux vs Windows, it helps to know what each one actually is. Windows is a proprietary operating system developed and owned by Microsoft. It’s meant to be consistent, easy to use and tightly integrated with Microsoft’s own software ecosystem — Office, OneDrive, Teams, etc. Most consumer desktop and laptop PCs are shipped with Windows pre-installed, which is a huge part of the reason it’s the most popular desktop OS in the world. But Linux isn’t a single operating system made by a single company. It’s an open-source kernel that is used to build many different operating systems — called distributions, or “distros”. All four distributions are built on the same Linux kernel, but they differ in appearance, tools and intended audience. One of the first things that people trip over in a Linux vs Windows discussion is that Windows is one product, whereas Linux is really a family of related systems. Free vs. Paid Licensing Cost   Cost is one of the most immediate differences in the Linux vs Windows comparison. Windows, whether you purchase it separately or bundled with a new computer, requires a paid license. For example, Windows Pro or Windows Server are editions with more features, and businesses often pay extra licensing fees for these. Linux, on the other hand, is free and open source. The most common distributions are free to download, install and use, including for commercial purposes. This is a big reason why Linux is so popular in server environments, cloud computing, and any situation where someone is deploying on a budget and the licensing costs can add up quick across hundreds or thousands of machines. That said, “free” doesn’t automatically mean “better for everyone.” Free also means community-driven support in many cases, not a dedicated customer service line — something worth factoring in if you’re used to Microsoft’s support structure. Open Source vs. Proprietary Why It Matters This is where the Linux vs Windows discussion gets a bit more philosophical, but it has real world implications. Linux is open source, which means anyone can look at the source code, change it, or redistribute it. This transparency is a big part of why security professionals and developers trust it; vulnerabilities can be discovered and patched by a global community, not just a single company’s internal team. Windows is a proprietary operating system, which means the source code is closed and controlled completely by Microsoft. Updates, patches and features come on Microsoft’s schedule, and users have far less visibility into how the system works under the hood. Neither is “more secure” by default, and in all cases, but that openness is exactly why Linux is the default choice in cybersecurity, penetration testing and server infrastructure — fields where knowing and controlling exactly what a system is doing really matters. User interface and User Experience   This is the side of the Linux vs Windows debate that most beginners care about most of the time. Windows is built on one graphical interface that is consistent and that most people know already from years of use. Installing software, settings, file management. All are patterns most users already know intuitively. In this respect the various Linux distributions are more varied. Some, like Ubuntu or Linux Mint, offer graphical interfaces very similar to Windows or macOS, so the transition is fairly smooth. Others, such as Kali Linux, designed for server or security work, are heavily command-line driven and assume the user is perfectly comfortable working without a graphical interface. This is really one of the biggest adjustment points people run into: Windows assumes you’re mostly clicking through menus, while many Linux environments expect at least some comfort in typing commands directly. It’s not that Linux is harder, it’s that it gives you more power right away, which has a bit of a steeper initial learning curve. Software & application compatibility The availability of software is a practical and often decisive factor in the decision between Linux and Windows. Windows has the largest library of consumer and business software available anywhere. Almost every commercial application, game and proprietary tool is designed with Windows compatibility in mind. Linux has great support for open-source software, development tools, and server applications, but mainstream consumer software (some games, some proprietary business applications, and certain creative tools) is often not available natively, though compatibility layers and alternatives exist for many use cases. This is often the main reason casual users are hesitant to fully switch to Linux even though they are attracted to its other benefits. Security Aspects One of the most frequently mentioned differences in the Linux vs Windows comparison is security and for good reason. Windows has the biggest desktop user base and so is the most targeted platform for malware and attacks, simply because of scale. So, in the past, Linux has been a less attractive target for the sort of malware that plagues everyday Windows users. This is because of its smaller desktop market share, as well as its permission structure and open source transparency. This isn’t to say Linux is immune to security concerns — far from it — but the way it’s built, particularly with user permissions and system access controls, gives admins finer-grained control over what can and can’t

Advance Cloude Security

OSI Model Explained: A Complete Guide to All 7 Layers

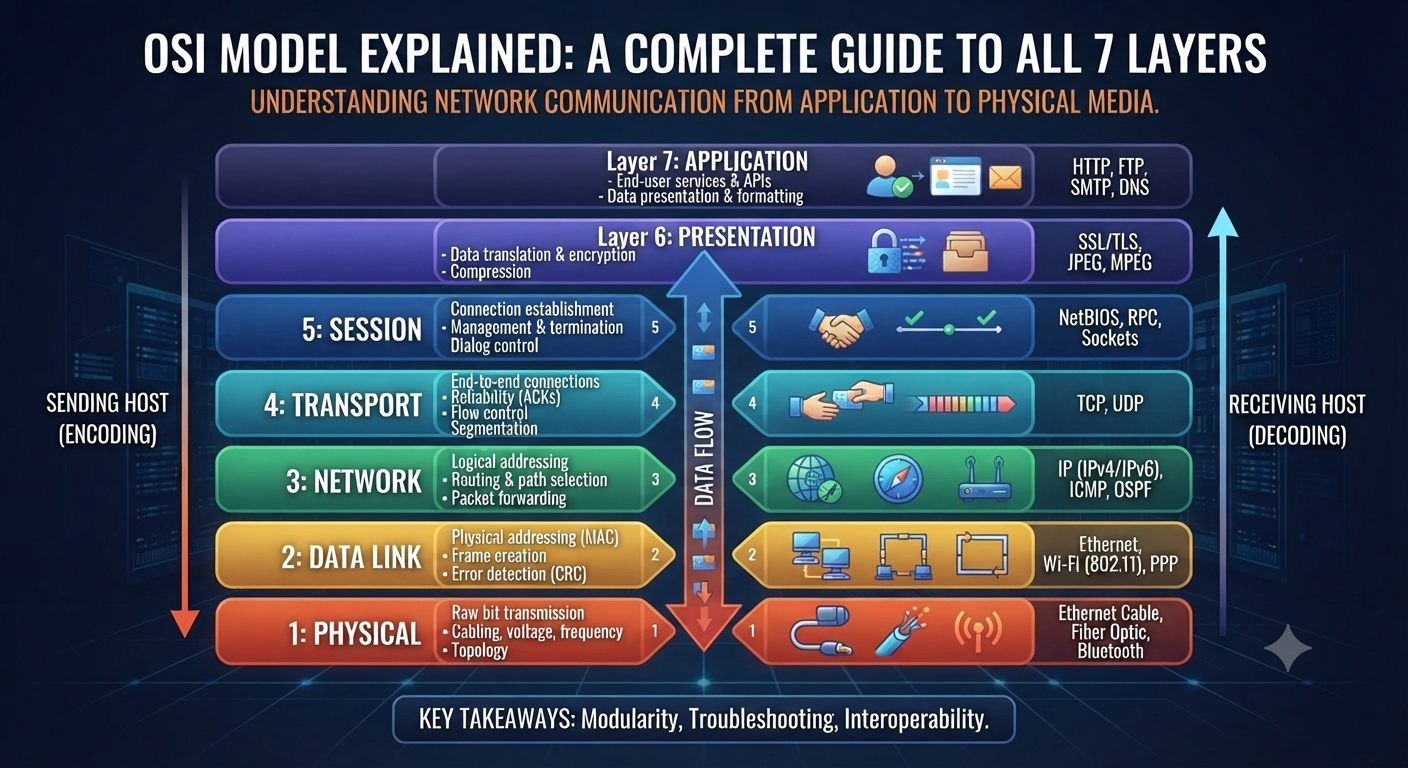
The OSI Model Explained: A Complete Guide to the 7 Layers   If you have started learning networking, then you would have heard about the OSI Model within the first few days. You’ll see it in every textbook, on every certification exam, and in almost every networking interview question. And with good reason: it’s the most useful mental model for understanding how data actually travels from one device to another. In this guide we’ll walk through this framework one layer at a time, explain why it still matters even though real-world networks don’t follow it exactly, and show you how to actually remember all seven layers without just memorizing a list. The OSI model is the Open Systems Interconnection model. The OSI Model, which stands for Open Systems Interconnection Model, is a conceptual model that standardizes the way in which various network protocols communicate and interact with one another. It breaks the whole process of network communication into 7 different layers . Each layer has a specific job . Think of it like a mail system . A letter passes through several stages before it arrives at its destination: it is written, put in an envelope, addressed, sorted and delivered. This is the same idea as the framework, except instead of a letter you have data moving across a network, and instead of a mail carrier each layer passes the data to the next. The International Organization for Standardization (ISO) developed it to give network engineers a common language and standard way to design and troubleshoot systems, no matter the vendor or technology used. Why the OSI Model Still Matters Today   Some students ask why they need to learn this framework, since real networks run on the simpler four-layer TCP/IP model. This is why it still deserves a place in every curriculum: It is the standard troubleshooting framework. When something goes wrong, network engineers will ask, “which layer is this happening at,” and that question alone quickly identifies the issue. It establishes a common language. It is this model that makes sense of terms like “Layer 2 switch” or “Layer 3 routing.” Engineers all over the world use the same reference points. It’s on all the major certifications. CCNA, Network+ and nearly every other entry-level IT exam tests your knowledge of it directly. It simplifies a very complicated thing. It’s much easier to learn than trying to understand everything at once when you break down the network communication to 7 more manageable parts. Although real hardware and software do not break down into exactly seven discrete layers, this model is still the best teaching tool in the industry for understanding how networks work. Understanding the 7 Layers of the OSI Model     As data is sent, it passes down through the layers. As data is received, it passes back up through the layers. Lets look at each layer from the one closest to the user. Layer 7 Application Layer This is the layer you actually work with. It includes the protocols that permit applications to communicate over a network, such as HTTP (web browsing), FTP (file transfers), and SMTP (email). This is the layer you are working at when you open a browser and load a website. Layer 6: The Presentation Layer This layer handles formatting, encryption, and compression so that data sent by one system is correctly understood by another. Basically it converts the data to a format that both sender and receiver understand . It also does some other stuff like SSL/TLS encryption . Layer 5: Session Layer It is responsible for the establishment, management and closure of communication sessions between two devices. It keeps track of whose turn it is to send data. It keeps sessions in sync, which is very important for things like video calls and long file transfers. Layer 4: Transport Layer This is where the data is reliably delivered. TCP and UDP are live protocols here. TCP ensures data arrives in the right order, but UDP sacrifices this guarantee for speed, which is why it’s used for live streaming and online gaming. Layer 3 Network Layer The Network Layer takes care of logical addressing and routing . It finds the best path for data to travel through multiple networks . It is responsible for getting data from one network to another . At this layer IP addresses and routers are used . Layer 2: Data Link Layer This layer is responsible for formatting data for transmission, and detecting errors, between two directly connected devices. MAC addresses and switches are found here and this layer is also where Ethernet frames are created. Layer 1: The Physical Layer Here’s the groundwork: real cables, network adapters, radio frequencies, electrical signals. This is simply the transmission of bits, ones and zeroes, over a physical medium. Remembering the Layers of the OSI Model     Most students use a mnemonic to cement the order in memory. One popular one going down from Layer 7 to Layer 1 is: “All People Seem To Need Data Processing” All = Application People = Presentation seem = session To = Transport Need = Network DataLink = Data Processing = Physical Choose your own poison or make your own. Whatever floats your boat. The exact wording of the mnemonic is much less important than the order. OSI Model vs TCP/IP Model: Significant Differences A lot of beginners get confused between these two so here is a clear side by side comparison. Factor TCP/IP Model This Framework Number of layers 4 layers 7 layers Origin ISO theoretical standard development Developed by the U.S. Department of Defense, based on actual protocols Usage Instruction and Troubleshooting Guide What real-world networks actually run Application, Presentation, Session Equivalent to Layer 7-5 Combined into a single Application layer Equivalent to Layer 4 Transport Transportation Equivalent of Layer 3 Network Internet Layer 2-1 equivalent Data Link, Physical Combined into one Network Access layer Real World Examples of OSI Model Knowing the layers in theory is one thing.

Advance Cloude Security

IP Subnetting Made Simple: A Step-by-Step Guide for Beginners

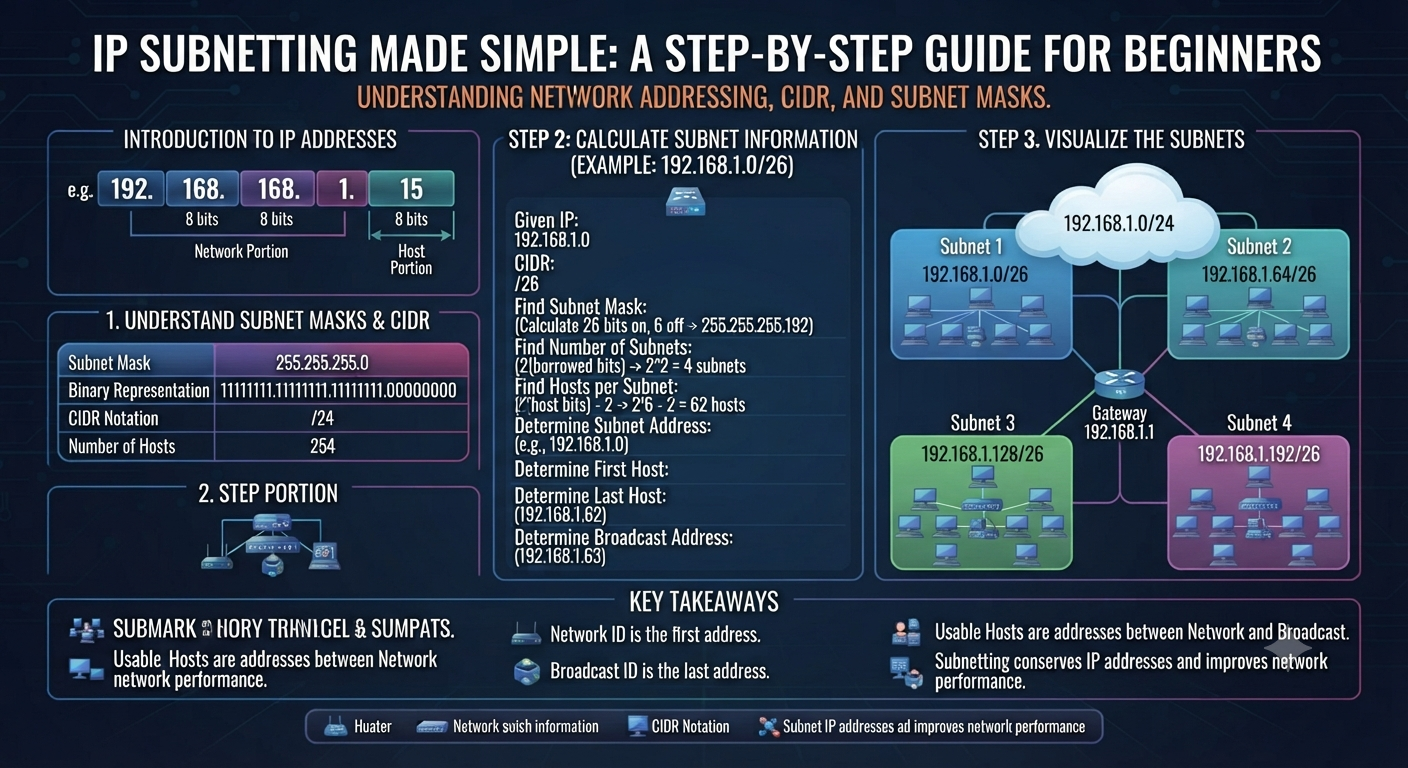
IP Subnetting Made Easy – A Novice’s Guide   If you have ever opened a networking textbook, and run into a wall of binary math on the first page about subnetting, you are not alone. IP subnetting is the networking topic that scares the bejeebies out of beginners. But it’s really pretty simple once someone explains it in plain English rather than pure math. This guide will take you step by step, and with a real world example, so you can calculate subnets with confidence for your CCNA studies or your first office network. What is IP Subnet? IP subnetting is the technique of dividing a large network into smaller, more manageable sub-networks called subnets. Instead of having all devices on one flat network, subnetting lets you carve up that address space into logical chunks – one for each department, floor or purpose. Picture a company building with an open floor plan, and then the same building with private offices. Both are the same size in terms of people but breaking it down into rooms makes it much easier to manage where people go, control traffic and keep things organised. That’s precisely what subnetting does for a network. The significance of IP subnetting in networking   Without subnetting, every device on a network is part of one big broadcast domain. As the number of devices on the network grows, this quickly becomes slow, messy, and insecure. Subnetting solves this by: Reduce network congestion by limiting broadcast traffic to smaller groups Improve security by isolating departments or types of devices from each other More efficient allocation of IP addresses and less waste of large address blocks Being able to localize problems to a particular subnet to aid troubleshooting This is one of the primary reasons why IP subnetting is one of the first practical skills tested in CCNA and other networking certifications – nearly all real-world network design decisions are based on it. Key terms you should know before There are some terms that come up over and over here, so it is helpful to define them clearly before we get into the steps: IP Address: A unique number assigned to each device connected to a computer network (e.g. 192.168.1.10) Subnet Mask: A number that divides the network part from the host part of an IP address (e.g. 255.255.255.0) CIDR Notation: A short form of a subnet mask, written as a slash followed by a number (e.g., /24) Network ID: Address that identifies the subnet, not a particular host Broadcast Address: This is the address used to send data to all devices on that subnet at once Host: Any device, such as a computer or printer, that has been assigned an IP address on the subnet How to Subnet IP Addresses (Step by Step) Here’s the real deal broken into five manageable steps. Step 1 — Know the IP Address Structure IPv4 address is 32 bits long, split into four groups known as octets (e.g. 192.168.1.10). Each octet can be from 0 to 255. An IP address is divided into two parts: the network part, which identifies the general network, and the host part, which identifies the particular device. Step 2 — Find the Subnet Mask The subnet mask tells you exactly where the network part ends and the host part begins. For example, a subnet mask of 255.255.255.0 (or /24 in CIDR notation) means that the first three octets are used for the network and the last octet is used for host addresses. This is the one number that the whole of every netting calculation is based on. Step 3 — Determine the Number of Subnets and Hosts Knowing the subnet mask, you can determine how many subnets and usable host addresses the subnet mask creates. The general formulas are Number of subnets = 2^ (borrowed bits) Usable hosts per subnet = 2^(remaining host bits) – 2 The “minus 2” is because of the network ID and the broadcast address which cannot be assigned to actual devices. This is where the bulk of the math anxiety actually happens. When you memorize the formula, it becomes rote. Step 4: Locate the Subnet Ranges Once you have worked out the number of subnets, you then need to work out the range of each subnet. This includes the network ID of the subnet, the usable IP range of the subnet, and the broadcast address of the subnet. It is this part of the process that makes the math practical to assign to devices in reality. Step 5. Assign IPs to Devices Then you assign individual IP addresses from the usable range of each subnet to devices, servers or interfaces, keeping the network ID and broadcast address free. This is where the entire subnetting process becomes a real working network design. Example Walkthrough of IP Subnetting   Let’s walk through a simple real example. Imagine you have the network 192.168.1.0/24 and want to cut it into 4 smaller subnets. A /24 network has 8 host bits (32-24=8). To make 4 subnets you need to borrow 2 bits (2^2 = 4 subnets), so the mask changes from /24 to /26. Your new subnet mask is 255.255.255.192. This gives you 4 subnets with 64 addresses ( 2^6 = 64 ) each. Each subnet has 62 usable host addresses (2 are reserved for the network ID and broadcast address). The four resulting subnets are: 192.168.1.0/26 (usable range .1 to .62) 192.168.1.64/26 (Usable range .65 – .126) 192.168.1.128/26 (usable range: .129 to .191) 192.168.1.192/26 (usable range .193 through .254) That’s the whole process in action — one network address turned into four independent, organized subnets, each of which can hold 62 devices. Top Mistakes to Avoid in IP Subnetting When learning this skill, beginners tend to make the same handful of errors: forgetting to subtract 2 hosts for network ID and broadcast address Mixing up subnet mask and default gateway – they are two totally different things Miscoding borrowed bits, affecting all subsequent calculations IP conflicts across