Devops

Social Engineering Attacks: Types and Prevention

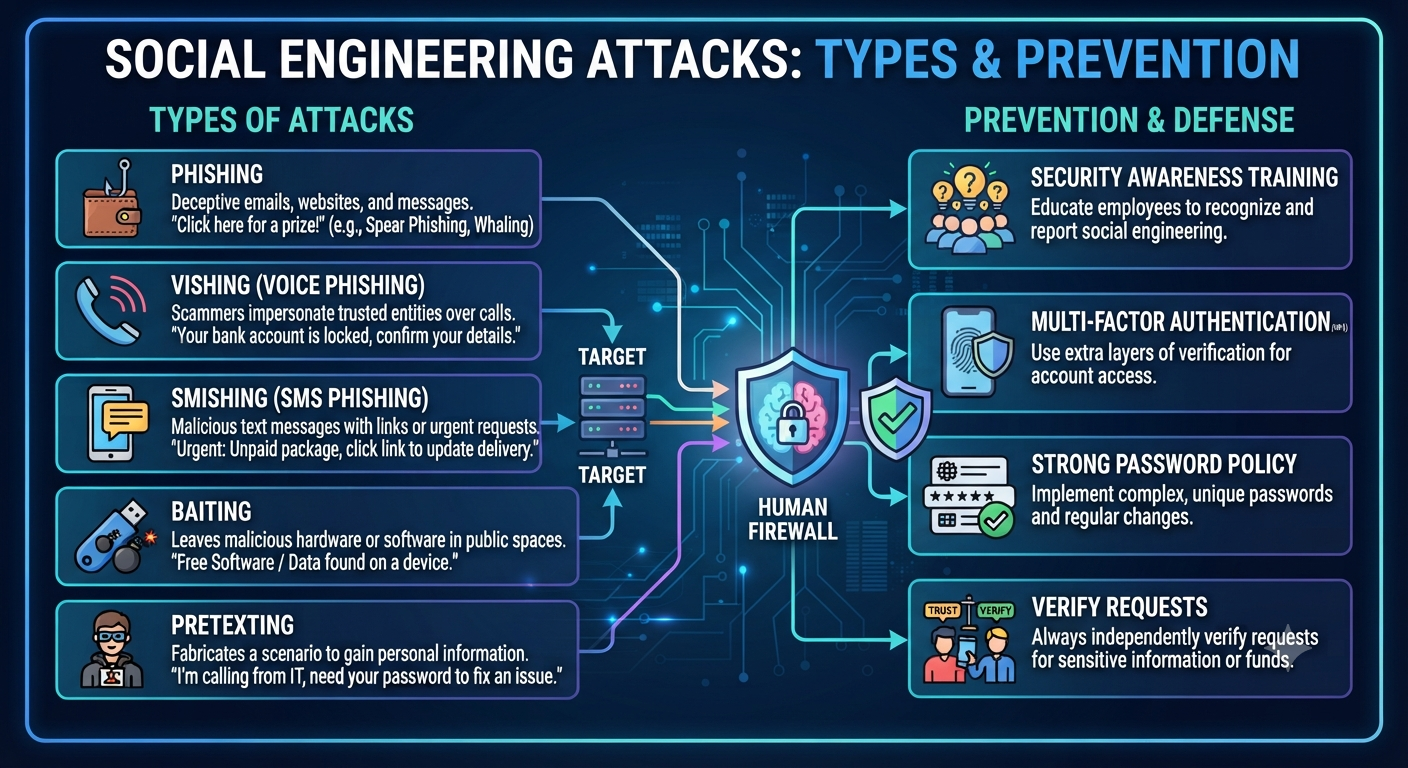
Social Engineering Attacks: Types and Prevention 5 Social engineering is one of the most dangerous cybersecurity threats facing individuals and organizations today. Unlike traditional cyberattacks that focus on exploiting software vulnerabilities or network weaknesses, social engineering attacks target the human element. Cybercriminals manipulate emotions, exploit trust, and deceive people into revealing sensitive information or performing actions that compromise security. As technology continues to evolve, attackers have become increasingly sophisticated in their methods. They no longer rely solely on technical hacking techniques; instead, they exploit psychological principles such as fear, urgency, curiosity, authority, and trust. A single employee clicking on a malicious link or sharing confidential information can lead to data breaches, financial losses, identity theft, or ransomware attacks. Whether you are an individual, a business owner, or an IT professional, understanding how social engineering works is essential for protecting sensitive information. This guide explores the different types of social engineering attacks, how they operate, and the best practices to prevent them. What Is Social Engineering? Social engineering is a cyberattack technique in which attackers manipulate people into revealing confidential information or performing actions that benefit the attacker. Instead of breaking into systems through technical vulnerabilities, social engineers exploit human psychology. They persuade victims to disclose passwords, banking information, personal details, or company secrets without realizing they are being deceived. These attacks can occur through emails, phone calls, text messages, social media platforms, or even face-to-face interactions. Some common objectives of social engineering attacks include: Stealing login credentials Accessing confidential company data Financial fraud Identity theft Installing malware Bypassing organizational security controls Because these attacks target people rather than technology, even organizations with strong cybersecurity infrastructure can become victims if employees are not properly trained. Why Are Social Engineering Attacks So Effective? Cybercriminals understand human behavior remarkably well. Rather than attempting to crack strong passwords or bypass firewalls, they convince people to willingly hand over sensitive information. Social engineering attacks succeed because they exploit emotions such as: Fear Trust Curiosity Sympathy Greed Urgency For example, an email claiming that your bank account has been locked may pressure you into clicking a malicious link without verifying its authenticity. Similarly, an attacker pretending to be a company executive may convince an employee to transfer money or share confidential files. Common Types of Social Engineering Attacks 1. Phishing 6 Phishing is the most common form of social engineering. Attackers send fraudulent emails that appear to come from trusted organizations such as banks, online services, or employers. These emails often encourage victims to: Click malicious links Download infected attachments Enter login credentials Verify payment information Example A user receives an email claiming to be from Microsoft stating that their account will be suspended unless they verify their password immediately. The link directs them to a fake login page designed to steal credentials. 2. Spear Phishing Unlike regular phishing, spear phishing targets a specific individual or organization. Attackers spend time researching their victims using LinkedIn, Facebook, company websites, or leaked databases before launching personalized attacks. Because these emails include accurate names, job titles, or company information, they appear much more legitimate. 3. Whaling Whaling is a specialized phishing attack aimed at executives, CEOs, CFOs, or senior management. These attacks typically involve requests for: Wire transfers Confidential reports Employee payroll data Financial records Since executives often have access to highly sensitive information, they are valuable targets. 4. Vishing (Voice Phishing) Vishing uses telephone calls instead of emails. Attackers impersonate: Bank representatives Government officials Technical support staff Law enforcement agencies They pressure victims into revealing: Credit card numbers Banking credentials One-time passwords Personal identification information 5. Smishing (SMS Phishing) Smishing attacks are delivered through text messages. Victims receive messages claiming: A package is waiting for delivery Their bank account is locked They have won a prize Immediate payment is required These messages typically contain malicious links that steal information or install malware. 6. Pretexting Pretexting involves creating a believable story to obtain confidential information. For example, an attacker may pretend to be: An HR representative An IT administrator A bank employee A government officer The attacker carefully builds trust before requesting sensitive information. 7. Baiting Baiting lures victims with attractive offers. Examples include: Free software downloads Gift cards USB drives left in public places Free movies or games Once accessed, these files often install malware. 8. Tailgating (Piggybacking) Tailgating is a physical social engineering attack. An unauthorized person follows an employee through a secured entrance without using proper credentials. Example: Someone carrying boxes asks an employee to hold the security door open, gaining access to restricted areas. 9. Quid Pro Quo In this attack, criminals promise something valuable in exchange for information. Examples include: Free technical support Software activation Gift vouchers Exclusive services Victims unknowingly provide login credentials or sensitive data. Warning Signs of Social Engineering Many attacks share common warning signs. Be cautious if you notice: Urgent requests requiring immediate action Unexpected emails requesting passwords Poor grammar or spelling mistakes Suspicious attachments Unknown phone numbers requesting confidential information Links that don’t match official websites Requests to bypass normal procedures If something feels unusual, verify it before taking action. Real-World Impact of Social Engineering Social engineering attacks have caused some of the largest cybersecurity incidents worldwide. Their consequences include: Financial losses Identity theft Data breaches Ransomware infections Business disruption Reputation damage Regulatory penalties A single successful phishing email can compromise an entire organization’s network. Best Practices to Prevent Social Engineering Attacks 5 Preventing social engineering requires both technology and user awareness. 1. Security Awareness Training Regular employee training helps users recognize suspicious emails, fake websites, and scam phone calls. Organizations should conduct phishing simulations to improve awareness. 2. Verify Every Request Never trust unexpected requests involving: Passwords Financial transactions Personal information Sensitive documents Always verify requests through official communication channels. 3. Enable Multi-Factor Authentication (MFA) MFA significantly reduces the impact of stolen passwords. Even if attackers obtain login credentials, they cannot easily access accounts without the second authentication factor. 4. Use Strong Passwords Every account should have:
Advance Cloude Security

Linux Security Best Practices for Beginners

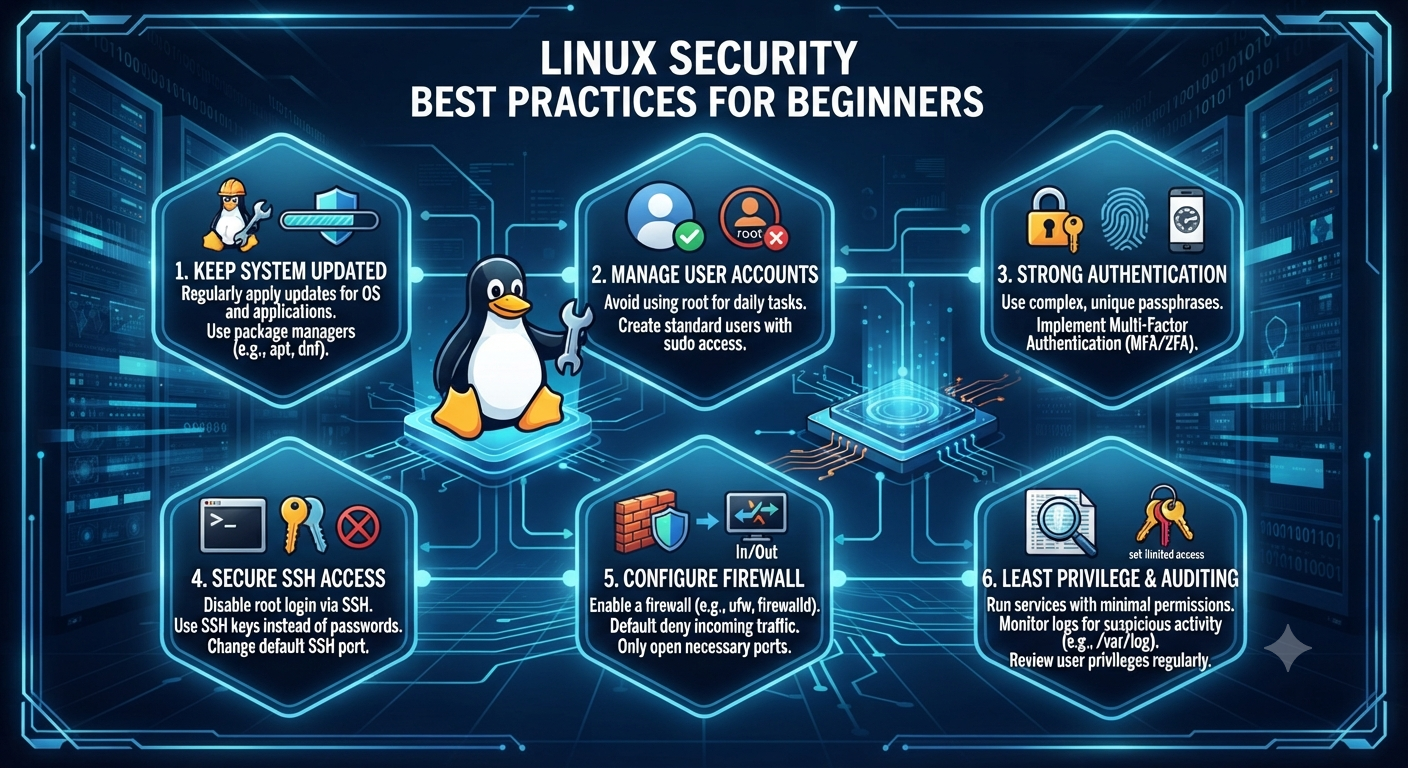
Linux Security Best Practices: Complete Guide to Hardening for Newbies Linux powers a significant portion of the world’s digital infrastructure. It runs everything from personal computers and software development workstations to enterprise databases, cloud servers, web hosting platforms, and containerized applications. Its stability, flexibility, and open-source nature have made Linux one of the most trusted operating systems for individuals and organizations alike. Although Linux is widely recognized for its strong security model, it is important to understand that no operating system is completely secure by default. Most Linux distributions are designed with usability and compatibility in mind, allowing users to install applications and services with minimal effort. However, these default configurations may not provide the highest level of protection against modern cyber threats. If you’re new to Linux security, the number of security tools, commands, and configurations may seem overwhelming. Fortunately, becoming proficient at Linux hardening doesn’t require years of experience. By following a structured approach and implementing proven security best practices, you can significantly reduce vulnerabilities, minimize your attack surface, and build a more resilient Linux environment. This guide covers some of the most essential Linux hardening practices that every beginner should implement. 1. Update your system The simplest and most effective security habit is to keep software updated. Software bugs are regularly discovered, and vendors promptly issue patches to address them. If you don’t update, you leave known vulnerabilities open to malicious actors scanning the internet for easy pickings. Many cyberattacks succeed simply because organizations continue running outdated software with publicly known vulnerabilities. Attackers constantly scan internet-connected systems looking for servers that have not installed the latest security patches. Keeping your operating system updated is therefore one of the easiest ways to prevent compromise. Package Management Run commands on Debian/Ubuntu based systems to update software packages and refresh repositories: sudo apt update && sudo apt upgrade -y For Red Hat-based distributions such as CentOS, Rocky Linux, AlmaLinux, or Fedora, you can use: sudo dnf update -y or sudo yum update -y Kernel Patches The operating system kernel often has some critical security vulnerabilities hidden in it. If you need high availability, look into live-patching solutions or make sure your system kernel is regularly upgraded. A scheduled maintenance routine that includes kernel updates ensures your system remains protected against newly discovered exploits while maintaining long-term stability. 2. Principle of Least Privilege and Master User Account Management The Principle of Least Privilege is one of the key tenets of computer security. It states that users and processes should be granted the minimum permissions necessary to perform their designated functions. This principle limits the damage that can occur if an account becomes compromised. When users only have the permissions they require, attackers have fewer opportunities to move laterally through the system or gain administrative control. Do not use the root account for daily use The root account must never be used for regular scripts, browsing and everyday work. Instead, create a standard user account and use sudo (Superuser DO) only when you absolutely need to perform administrative actions. Using sudo creates accountability because administrative commands are logged, making it easier to audit system activity later. Periodically check the existing user accounts on your system. Look at /etc/passwd. Delete any inactive accounts, service users who are no longer active or any remaining test profiles. It is also good practice to review group memberships regularly to ensure users have only the permissions required for their current responsibilities. 3. Implement robust authentication and password policies Brute-force attacks are meant to exploit credentials that are weak and easily guessed. You protect yourself from automated script-based hacks by setting tight standards of access at your entry points. Weak passwords remain one of the leading causes of unauthorized access. Attackers often use automated password dictionaries capable of attempting thousands of login combinations every minute. Complexity Standards Passwords must be 12 characters or longer and contain a good mix of uppercase and lowercase letters, numbers, and special symbols. Instead of using simple words or predictable sequences, users should consider long passphrases that are easier to remember but much harder to crack. Examples include combinations of unrelated words with numbers and symbols inserted naturally. Use Multi-Factor Authentication (MFA) Whenever you can, use MFA or Pluggable Authentication Modules (PAM) to add an extra layer of security on top of standard text passwords. Even if an attacker manages to steal a password, MFA greatly reduces the likelihood of unauthorized access by requiring an additional verification method such as a mobile authentication application or hardware security key. 4. Secure Shell (SSH) Access SSH is the first port of call for anyone who is tasked with managing a remote Linux server. Unfortunately, it also happens to be a prime target for malicious scanners looking for misconfigured services. Internet-connected servers receive thousands of automated SSH login attempts every day. Proper SSH hardening dramatically reduces the likelihood of successful attacks. Turn off SSH root login Turn off SSH root login, so an attacker can’t log in to the highest-privileged account directly from the network. Edit the SSH configuration file (/etc/ssh/sshd_config), and change the following: PermitRootLogin no This forces attackers to compromise a standard user account before attempting privilege escalation. Transition to SSH key pairs This includes Ed25519 or 2048 bit RSA keys. Cryptographic key pairs are much better than old style passwords. After you’ve successfully deployed and tested your SSH keys, disable password-based authentication entirely. SSH keys are resistant to brute-force attacks because authentication depends on cryptographic algorithms rather than human-generated passwords. Change the Default Ports and Use Fail2ban It’s a good idea to change the default SSH port (port 22) to minimize the amount of log spam produced by automated botnets. The installation of tools such as Fail2ban can also be effective in automatically blocking IP addresses that show malicious brute-force behavior. Fail2ban continuously monitors authentication logs and temporarily blocks suspicious IP addresses after repeated failed login attempts, providing another important layer of defense. 5. Set up a strict firewall policy A firewall

Advance Cloude Security

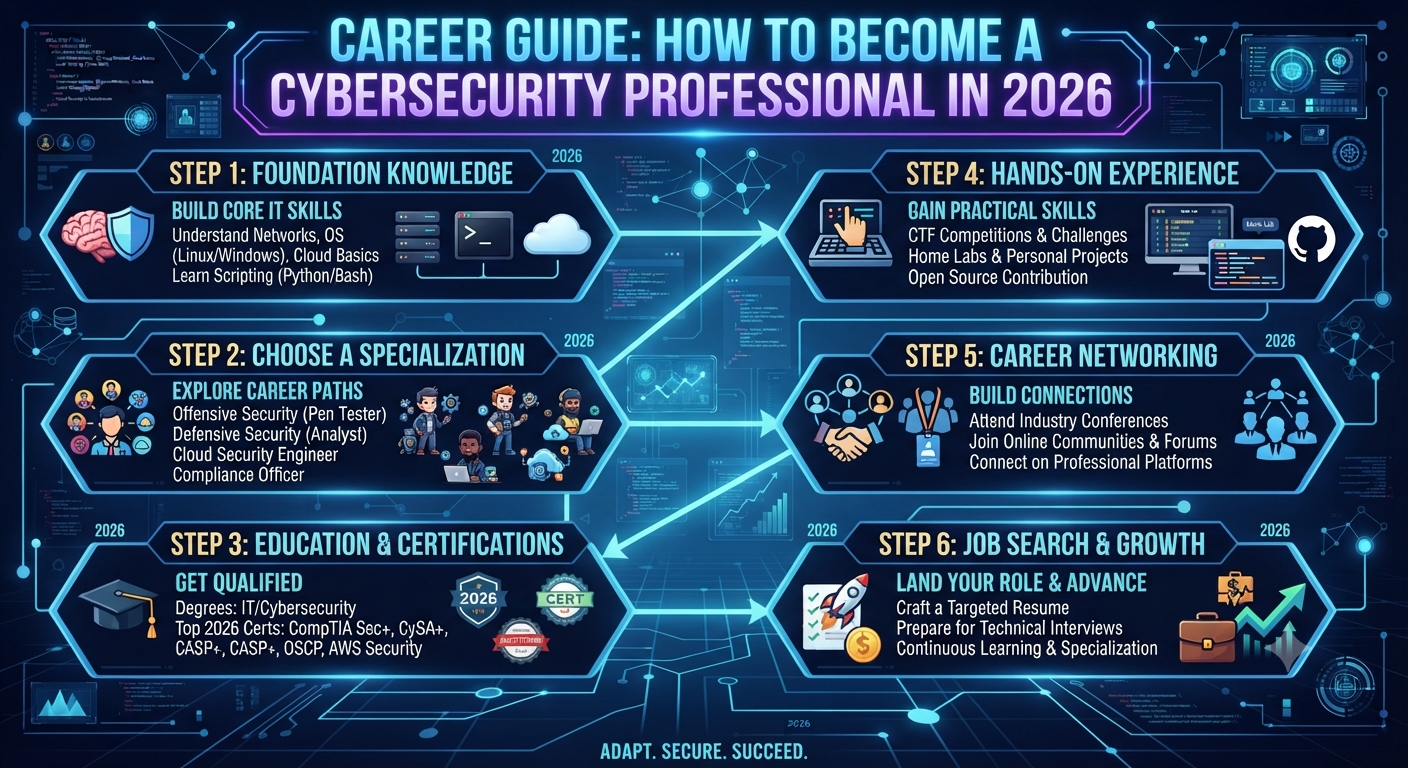
Career Guide: How to Become a Cybersecurity Professional in 2026

How to Become a Cyber Security Professional in 2026     Introduction Cybersecurity is one of the fastest growing technology industries and one of the most resilient given the world’s reliance on digital infrastructure As we approach 2026, the emergence of new technologies at a rapid pace, the increasing number of cyberattacks, and the changing nature of threats all contribute to a need for a skilled cybersecurity workforce. If you’re a student or an IT professional looking for new challenges or someone interested in a career change, a career in cybersecurity is a path of stability, opportunity and the satisfaction of protecting what matters most.This resource provides a complete overview of the strategies, skills and procedures needed to create and achieve success in a cybersecurity career. It provides a thorough overview of current trends, practical advice and tangible actions. Why is cyber security important? Organizations worldwide are facing a new level of cyber risk due to ransomware, phishing, and data breaches. This has resulted in a serious shortage of cyber security professionals. Industry estimates suggest millions of new cybersecurity jobs will need to be filled in the next several years. Top reasons to build a career in cybersecurity: Why: Cybersecurity threats are a persistent issue across all sectors and job security is a major concern. We will pay you a competitive salary and offer you attractive benefits in return for your professional skills. Career growth: There’s a very clear path from analyst to CISO in this field. Objective You’re at the forefront of safeguarding data, privacy and digital trust. Step 1: Getting to Know the Cyber Security Terrain Cyber security is a multi-dimensional topic. It’s useful to know what kind of roles are out there before you begin: Security Analyst Builds defenses, investigates incidents, maintains systems. Ethical Hacker (Penetration Tester) – Be a hacker, locate vulnerabilities before they are. Security Engineer – Designs & develops secure security systems. Incident Responder – Deals with and handles security incidents and cyber security emergencies. Security Consultant: Provides advice to organizations on compliance, risk management, and best practices. At the executive level, the CISO owns the security strategy. Different roles require different mixes of technical skills, analytical skills, and communication skills. Step 2: Create a Strong Foundation. “To succeed in the field of cybersecurity, one needs a good understanding of information technology. Specialties Networking – Knowledge of network architectures, protocols, firewalls and VPNs . Get to know the Linux and Windows operating systems. Programing: Not always needed, but learning a programing language, like Python or Bash, can be very useful for the automation and scripting of tasks. Security Fundamentals : Learn about encryption , authentication , access controls , and threat modeling . You can learn these skills at your own pace using open source labs, MOOCs and free online resources.   Step 3: Choose a RouteThere’s no one-size-fits-all approach to getting a cybersecurity career. The typical paths are following: Earn a related degree, such as information security or computer science. Self-Paced: Cybersecurity forums, blogs, YouTube tutorials, and courses. Bootcamps are immersive, hands-on programs that get you ready for a career in months, not years. Certification Industry recognized certifications are a sign of your abilities and can help you move forward (see list below). Many successful professionals use several of these methodologies and continue to learn and grow as technology progresses. Step 4: Get Certified One way to prove your skills and boost your credibility with potential employers is to get certified. These certificates are highly regarded by both beginners and seasoned professionals: CompTIA Security+ is an entry-level security certification. This is security 101. Certified Ethical Hacker (CEH) : Focuses on hacking techniques and penetration testing. Certified Information Systems Security Professional (CISSP) – This is best for professionals with considerable experience in security project management. Certified Cloud Security Professional (CCSP) and Certified Information Security Manager (CISM) Cloud security and management. Get certifications relevant to your career path and the jobs you want. Grab it. Employers want real skills, relevant skills, not pieces of paper. So here are some suggestions for practical experience: Home Labs Build virtual machines to test tools and simulate attacks in a safe setting Open Source Projects – Contribute to community and security tools. Security issues – participate in hackathons and CTFs (Capture The Flag). Internships: Seek out entry-level jobs or internships to help you build your professional network and resume. Volunteer. Work for a struggling small business or a non-profit that can’t afford to pay you. Step 6: Build Your Professional Network Cybersecurity is a very collaborative field. Networking is a great way to learn about job opportunities, emerging threats and technologies, and find mentors. LinkedIn – Join cybersecurity groups, network with cybersecurity professionals, and follow key people in the field. Attend conferences, meetups, virtual events, and local industry events. Online Communities: Join specific Slack channels, Discord servers and Reddit forums revolving around Cybersecurity. Never can the importance of a good network in one’s professional life be overstated. Step 7: Work on Your Soft Skills Technical skills are important, but the best cybersecurity professionals also possess strong soft skills. Communication: Explain complex concepts in an easy-to-understand way to those who aren’t technical. Being able to think creatively and problem solve is essential to anticipate and respond to potential hazards. Flexibility – Show that you can stay calm in a high pressure situation and be open to change. Morals. “You work on trust, and so you have to be held to the highest ethical standards. Learn, learn, learn.The world of cybersecurity is constantly evolving. What you know today may be obsolete tomorrow. Commitment to continuous learning. Subscribe to cybersecurity news and threat intelligence sources. Earn additional certifications. Take higher level classes. Explore emerging technologies such as artificial intelligence, cloud security and the Internet of Things. Step 9: Look into Career Progression and SpecializationWith experience, you could specialize in topics like compliance, red teaming (attack), blue teaming (defense), cloud security, or digital forensics. As you develop, you might find yourself in

Advance Cloude Security

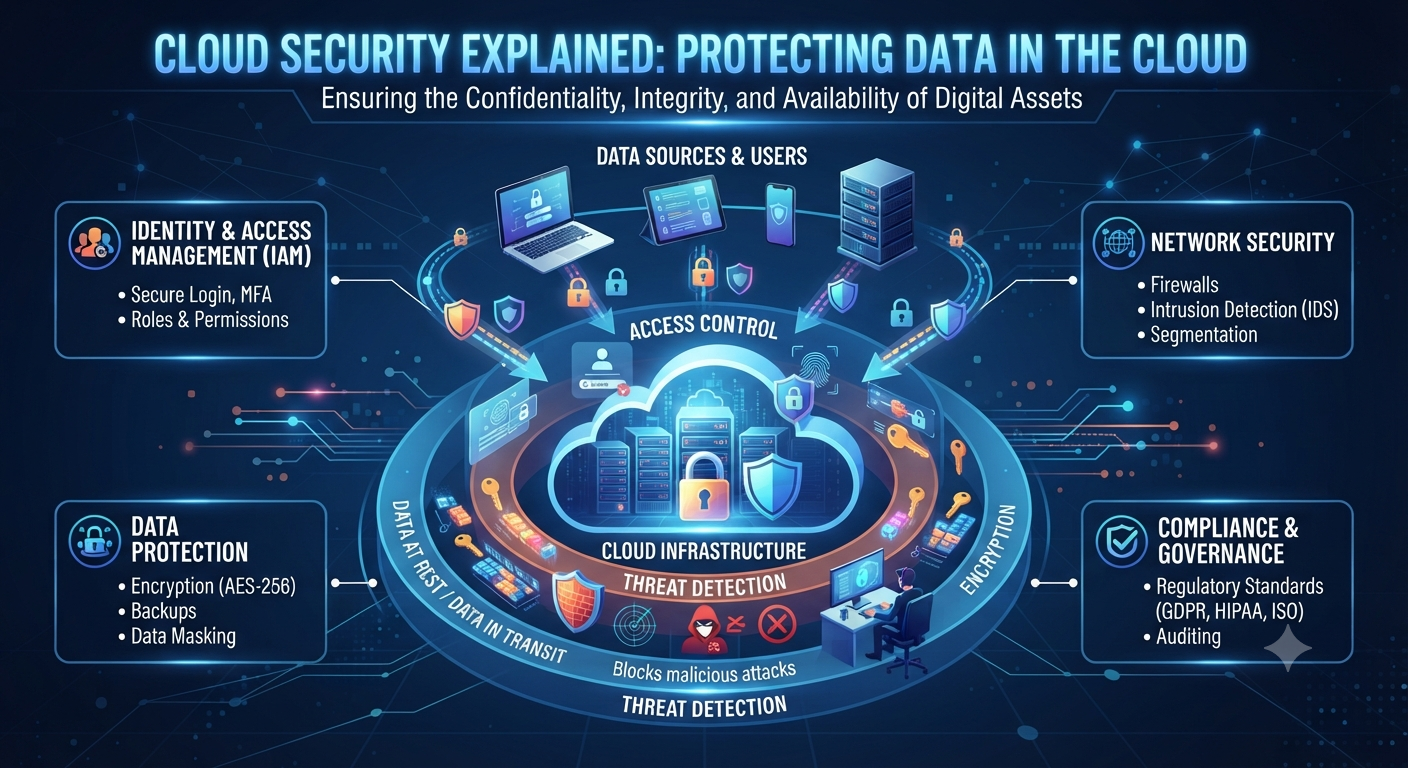
Cloud Security Explained: Protecting Data in the Cloud

Cloud Security: The Ultimate Guide to Protecting Data in the Cloud Introduction to Cloud Security: Data Protection in the Cloud   The advent of cloud computing has revolutionized the ways in which organizations and consumers store, process, and retrieve data. Instead of buying physical servers at their offices or data centers, organizations can use cloud platforms to scale their infrastructure, run applications, store files and run databases with a couple of clicks. Its versatility has sped up the digital transformation of almost every industry, from banking to healthcare to education to e-commerce. With sensitive data moving into the cloud, protecting such data becomes increasing important. Cybercriminals are always on the lookout for vulnerabilities they can exploit to steal sensitive information, disrupt business processes or gain unauthorized access to cloud resources. One security breach, such as a weak password or misconfigured storage bucket, can result in the loss of thousands of customer records, and significant financial and reputational damage. Cloud Security is the set of technology, policies, procedures and best practices used to protect systems, applications, and data that reside in the cloud. This allows organizations to enjoy the benefits of cloud computing without compromising on availability, integrity or confidentiality. In this guide, we will delve into the fundamentals of cloud security in detail, offering practical advice and highlighting common threats to assist individuals and organizations in safeguarding their cloud environments. What Is Security of the Cloud?   Cloud security is a set of technologies and protocols that are used to secure cloud-based data, applications and infrastructure from cyber-attacks. It is a blend of technical controls, operational procedures and governance policies designed to protect business continuity and mitigate security risks. Unlike traditional IT environments, cloud security follows a shared responsibility model. The cloud service provider secures the infrastructure underneath but the customer is responsible for securing their own applications, user accounts, data and configurations. A company might, for instance, keep sensitive customer data on a cloud platform. The provider is responsible for the security of the network and physical servers that support the service. The organization is responsible, however, for making sure that sensitive data is encrypted, access privileges are appropriate, and user activity is monitored. The Significance of Cloud Security     Organizations are moving to cloud computing to save on costs and for flexibility and scalability. But these benefits also bring new security problems. What if a company doesn’t have enough security? Data leaks Burglary by unlawful entry Amount of financial loss Outage of Service Sanctions for regulatory violations Distrust the customers A good cloud security strategy helps organizations shrink their attack surface, quickly spot threats, and maintain compliance with industry regulations. What is the Shared Responsibility Model?     Knowing who is responsible for what is one of the most important aspects of cloud security. Cloud Providers’ Responsibilities The majority of cloud providers implement security protocols such as: The data center’s physical location The networking platform Hard Disk Drives Virtualization platforms Cloud services that are core Customer Responsibilities Customers are usually responsible for: User account management Identity and Access Management (IDAM) Encryption of data during OS installation Application security Surveillance security measures Disaster recovery and backup “The number one reason for cloud security incidents is the lack of clear roles and responsibilities.” Cloud Security Risks     Many cyber threats are amenable to cloud environments. Understanding those risks is the first step toward building good defenses. Loss of Data A data breach is when confidential information is accessed without authorisation. Attackers may use stolen credentials, weak passwords or misconfigured cloud storage to access sensitive data. For example: Consider an online retailer that accidentally exposes a cloud storage bucket to the public. Anyone with the right URL could see customers’ names, e-mail addresses and payment details. Cloud Resources Misconfiguration Misconfiguration is often the bane of cloud security. Some examples: Publicly accessible databases Storage buckets accessible to the public No limitations on firewall policies User rights are too lenient Even the largest of organizations have had security issues due to simple configuration mistakes. Weaknesses in Identity and Access Management (IAM) Attacker can exploit compromised accounts due to insufficient access control. Common issues: Weak Passwords Common administrator accounts Multi-factor authentication not supported Too much rights Users can be confident that they will only be granted the minimum access necessary to do their jobs. This is the least authority principle. Internal Threats External attackers don’t cause all security incidents. Employees, contractors or partners with the required access could unwittingly or maliciously disclose sensitive information. Consistent monitoring and tight access controls minimize insider threats. Ransomware and Malware     Attackers can use malware to gain control over systems connected to the cloud. Ransomware can encrypt business data and only restore access after payment. Having secure backups and endpoint protection greatly reduces the severity of ransomware attacks. Account Take Overs Credential stuffing, phishing, and password reuse are the most frequent ways cybercriminals attempt to compromise cloud accounts. Actions Taken by the Attacker on Entry: Theft of sensitive information Further assaults are launched Build hardware for crypto currency mining Delete the backups Conceal the admin accounts One of the best defenses against account hijacking is multi-factor authentication. Features of Cloud Security     “A good cloud security solution is not one product, it’s a combination of many layers of protection.” Identity and Access Mgmt (IAM) IAM provides users with the authority to access cloud resources and perform actions. The main characteristics are as follows: Username Role-based access control (RBAC) Authorization Management Multi-factor authentication (MFA) Single sign-on (SSO) Data Encryption Encryption is the process of securing data so that it cannot be read by those who do not have the correct encryption key. Organizations should implement encryption for: Data at rest Data in transit Files that are backups Databases By encrypting data, you greatly reduce the amount of data that can be exposed in a breach of a storage system. Security Network “Security controls like protection and segmentation are a must to secure cloud networks.”

Advance Cloude Security

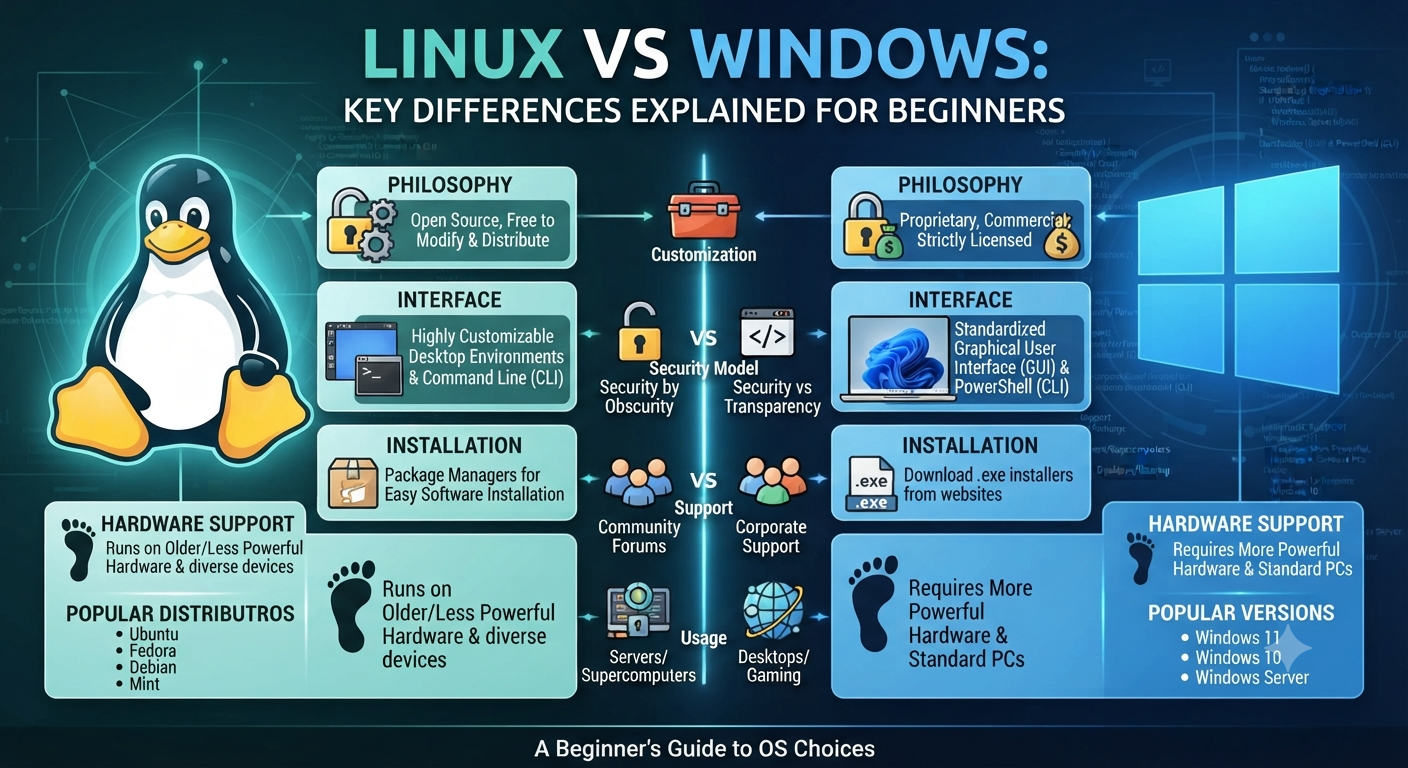
Linux vs Windows: Key Differences Explained for Beginners

Linux vs Windows – The Differences Explained for Newbies   For those of you who have spent your whole computing life within Windows, hearing people talk about Linux can sound like they are talking about a whole different kind of tech. It is not. But the difference is real and matters if you are thinking of switching, learning IT or even just curious why so many servers, developers and security professionals prefer Linux. This guide will compare Linux and Windows in plain English. We’ll look at what each operating system actually is, compare costs, security, customization, and software support, and help you decide which one makes sense for what you want to do. What is Linux and What is Windows? But before we start a feature-by-feature comparison of Linux vs Windows, it helps to know what each one actually is. Windows is a proprietary operating system developed and owned by Microsoft. It’s meant to be consistent, easy to use and tightly integrated with Microsoft’s own software ecosystem — Office, OneDrive, Teams, etc. Most consumer desktop and laptop PCs are shipped with Windows pre-installed, which is a huge part of the reason it’s the most popular desktop OS in the world. But Linux isn’t a single operating system made by a single company. It’s an open-source kernel that is used to build many different operating systems — called distributions, or “distros”. All four distributions are built on the same Linux kernel, but they differ in appearance, tools and intended audience. One of the first things that people trip over in a Linux vs Windows discussion is that Windows is one product, whereas Linux is really a family of related systems. Free vs. Paid Licensing Cost   Cost is one of the most immediate differences in the Linux vs Windows comparison. Windows, whether you purchase it separately or bundled with a new computer, requires a paid license. For example, Windows Pro or Windows Server are editions with more features, and businesses often pay extra licensing fees for these. Linux, on the other hand, is free and open source. The most common distributions are free to download, install and use, including for commercial purposes. This is a big reason why Linux is so popular in server environments, cloud computing, and any situation where someone is deploying on a budget and the licensing costs can add up quick across hundreds or thousands of machines. That said, “free” doesn’t automatically mean “better for everyone.” Free also means community-driven support in many cases, not a dedicated customer service line — something worth factoring in if you’re used to Microsoft’s support structure. Open Source vs. Proprietary Why It Matters This is where the Linux vs Windows discussion gets a bit more philosophical, but it has real world implications. Linux is open source, which means anyone can look at the source code, change it, or redistribute it. This transparency is a big part of why security professionals and developers trust it; vulnerabilities can be discovered and patched by a global community, not just a single company’s internal team. Windows is a proprietary operating system, which means the source code is closed and controlled completely by Microsoft. Updates, patches and features come on Microsoft’s schedule, and users have far less visibility into how the system works under the hood. Neither is “more secure” by default, and in all cases, but that openness is exactly why Linux is the default choice in cybersecurity, penetration testing and server infrastructure — fields where knowing and controlling exactly what a system is doing really matters. User interface and User Experience   This is the side of the Linux vs Windows debate that most beginners care about most of the time. Windows is built on one graphical interface that is consistent and that most people know already from years of use. Installing software, settings, file management. All are patterns most users already know intuitively. In this respect the various Linux distributions are more varied. Some, like Ubuntu or Linux Mint, offer graphical interfaces very similar to Windows or macOS, so the transition is fairly smooth. Others, such as Kali Linux, designed for server or security work, are heavily command-line driven and assume the user is perfectly comfortable working without a graphical interface. This is really one of the biggest adjustment points people run into: Windows assumes you’re mostly clicking through menus, while many Linux environments expect at least some comfort in typing commands directly. It’s not that Linux is harder, it’s that it gives you more power right away, which has a bit of a steeper initial learning curve. Software & application compatibility The availability of software is a practical and often decisive factor in the decision between Linux and Windows. Windows has the largest library of consumer and business software available anywhere. Almost every commercial application, game and proprietary tool is designed with Windows compatibility in mind. Linux has great support for open-source software, development tools, and server applications, but mainstream consumer software (some games, some proprietary business applications, and certain creative tools) is often not available natively, though compatibility layers and alternatives exist for many use cases. This is often the main reason casual users are hesitant to fully switch to Linux even though they are attracted to its other benefits. Security Aspects One of the most frequently mentioned differences in the Linux vs Windows comparison is security and for good reason. Windows has the biggest desktop user base and so is the most targeted platform for malware and attacks, simply because of scale. So, in the past, Linux has been a less attractive target for the sort of malware that plagues everyday Windows users. This is because of its smaller desktop market share, as well as its permission structure and open source transparency. This isn’t to say Linux is immune to security concerns — far from it — but the way it’s built, particularly with user permissions and system access controls, gives admins finer-grained control over what can and can’t

Devops

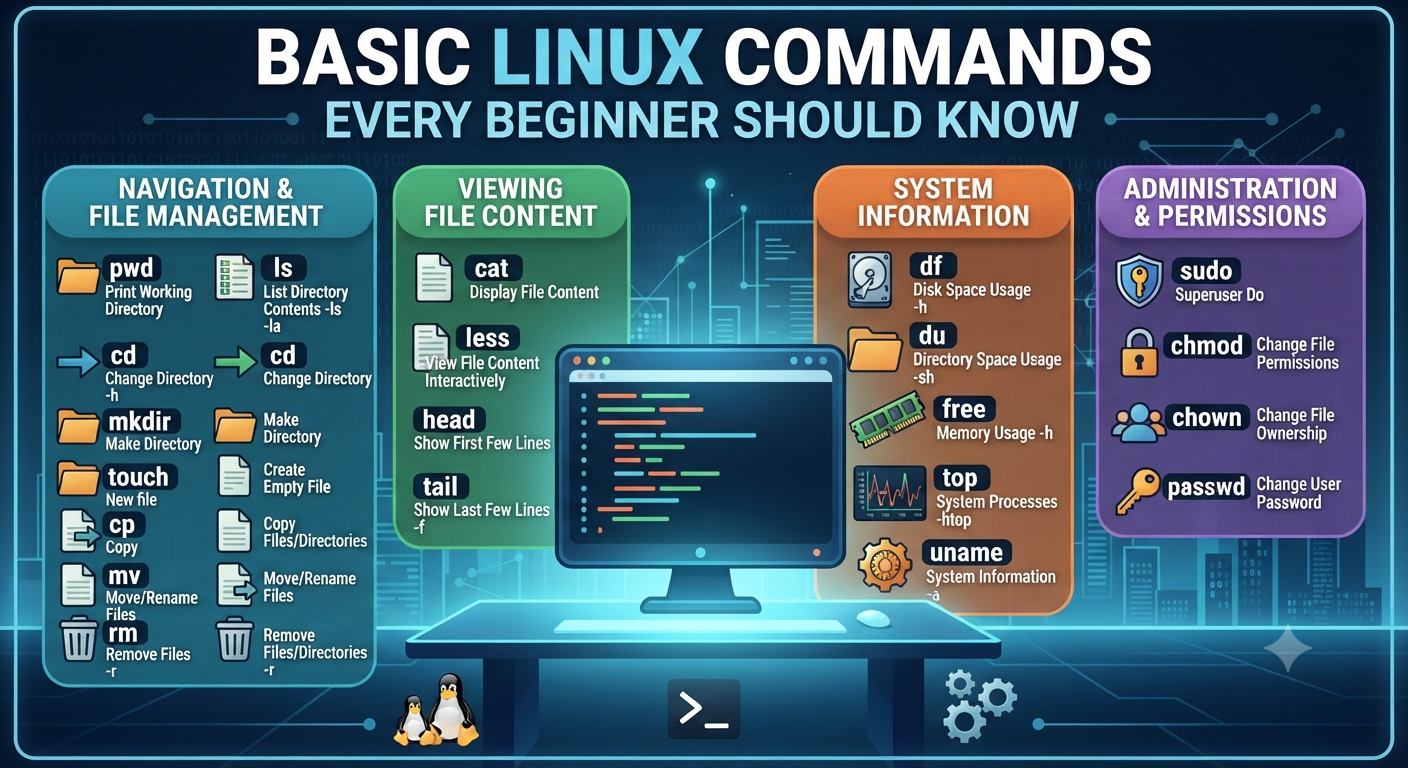
Basic Linux Commands Every Beginner Should Know

Essential Linux Commands Every Beginner Must Learn   When you first open a Linux terminal it can be like looking at a blank wall. There are no menu, no icons, just a blinking cursor waiting for you to type something. But the good news is you don’t have to memorize hundreds of commands to feel comfortable. A small, well-chosen set of basic Linux commands will cover almost everything a beginner needs for their first few weeks of learning. This is not a syntax dump. Instead, it walks through the areas every beginner should focus on when learning basic Linux commands, why each one matters, and how they fit together as you build real Linux skills — whether your goal is system administration, DevOps, or cybersecurity. So why learn basic Linux commands in the first place? You might ask yourself why the terminal is important at all, when Linux also has graphical interfaces. Most servers, cloud environments and security tools simply don’t have a desktop – only a command line. All RHCSA exams, all DevOps pipelines, and all penetration testing engagements assume you are comfortable working through a terminal, not clicking through menus. Knowing basic Linux commands is not about looking cool. It’s about being able to work faster, automate boring operations and work on remote systems without graphical user interface. When you get these skills down pat, the terminal is nothing to be scared of, and seems more like the most efficient way to do things. Begin with Navigation and Orientation But before you can do anything useful on Linux, you need to know where you are and how to get around. This is the first skill area that beginners almost always need to work on – knowing how to check where you are in the system and move confidently between different parts of the system. This sounds simple, but it’s foundational. Knowing how to orient yourself and navigate smoothly is assumed in almost every other task you will ever do in Linux. One of the most common reasons beginners get lost later on is rushing past this stage. Getting to Know Files and Folders Once you get comfortable navigating you move on to the next skill set. Managing files and folders themselves – creating them, organizing them, copying them, renaming them, removing them when they are no longer needed. Here again, beginners learn one of the most important lessons in Linux: deletion in Linux is permanent. There’s no recycle bin waiting to save you if you accidentally delete something. One of the best habits a new Linux user can form early on is the habit of double-checking before removing anything. Learn How to Read and View Content Sometimes you don’t want to launch a whole application just to look inside a file. It’s part of learning basic linux commands to be comfortable with viewing content directly, scrolling through longer files, and checking just the beginning or end of something without opening the whole thing. This skill will be particularly useful when you begin working with logs and system output, where you usually want to see information as it is updated in real time, not reading a static snapshot. How to Search Effectively As systems get more complex, it becomes important to be able to find things quickly. There are two closely related skills that are relevant here. Finding files by name or by their properties. Searching the contents of files for particular text or patterns. Together, these searching skills allow you to locate pretty much anything on a system — whether it is a misplaced item or a single relevant line in a mountain of information. This is one of those areas where comfort with basic Linux commands starts to feel powerful rather than just functional. Learn About Permissions & Ownership On a Linux system, everything is owned by someone, and there is a set of rules that control who can see it, change it, or run it. Understanding how to check and adjust these settings is an important part of using Linux responsibly, especially on shared or multi-user systems. That’s a deep topic all by itself (we’ve covered it extensively in our dedicated guide to Linux file permissions) but even a basic understanding of how ownership and access control works will go a long way toward rounding out your early skill set. System Health & Status Review Sometimes you just want to know what’s going on on the machine itself – who’s logged in, how much storage is available, what’s running, general information about the system. You won’t be doing these checks every single day, but when something feels wrong – slow performance, limited storage, odd behavior – this is usually the first place experienced Linux users will look. Getting familiar with these status checks early on means you won’t be flying blind the first time something needs troubleshooting. Find Out How Software Is Installed   You do not download installers as you might on other OSes. Usually (depending on the Linux distribution you use) software is installed and managed through a package manager. Beginners should understand this concept early, along with the general idea of elevated permissions — temporarily gaining administrator-level access to perform actions that affect the whole system rather than just personal files. This idea comes up all the time once you get beyond personal experimentation and into managing real systems. Typical New Player Mistakes Memorizing everything all at once. You get used to basic Linux commands through repetition, not by trying to memorize them all at once. Not including the included manual pages. In Linux, all commands are documented right in the system, and usually faster to check than look up online. Being reckless with deletion. There is no undo, so always confirm what you are removing before hitting enter. Freaking out about those tasks that actually need elevated permissions because you’re scared to use them at all. Basic Linux Commands FAQ (Frequently Asked Questions) 1. What is the most important area of

Advance Cloude Security

Identity and Access Management in the Cloud

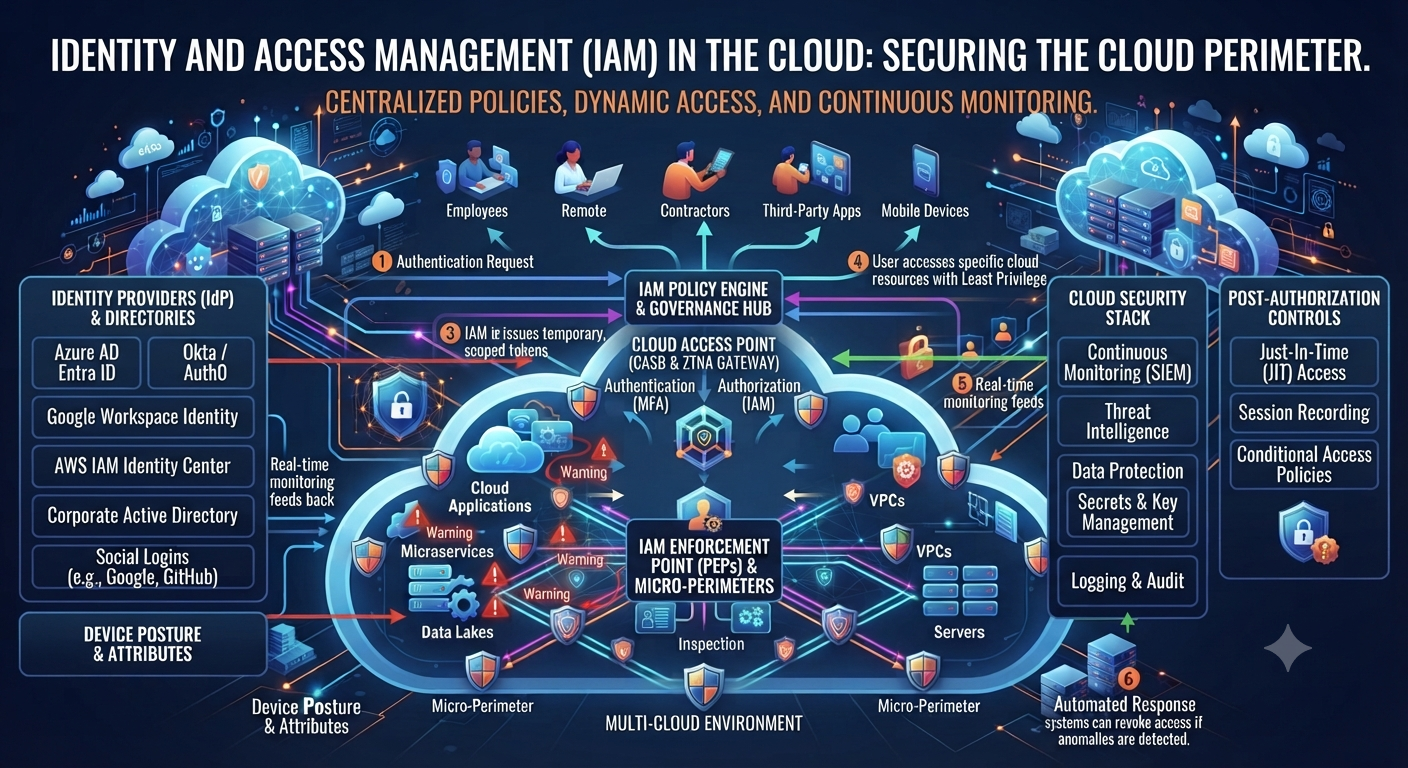
Cloud Identity and Access Management: Securing Human and Non-Human Identities   Image: Digital cloud with identity icons, representing both human and non-human accounts in the cloud. The cloud security conversation for years was about employees: who has the password, who forgot to log out, who clicked the phishing link. That world is over. Most of the “identities” logging into your cloud environment today aren’t people. They are service accounts, APIs, containers, AI agents, and there are many more of them than there are humans on your payroll. And that’s precisely why Identity and Access Management has become the most critical layer of cloud security. In this guide we’ll unpack what this framework actually means, why non-human identities have become such a massive blind spot, and the practical steps you can take to secure both sides of the equation. What Is Identity and Access Management? What is Identity and Access Management (IAM)? Identity and Access Management, also known as IAM, is the collection of policies and technology that controls who or what can access your cloud resources and what they can do with them. Every time you log in, make an API call, run an automated script against your cloud environment, you’re passing through some version of this framework whether you realize it or not. At the core of this discipline is the answering of two questions for each and every request: who are you and what are you allowed to do? Get either of them wrong and you’ve opened a door that should never have been opened. Why Identity and Access Management is More Important Than Ever The cloud used to be relatively easy to secure because there were fewer moving parts. That is no longer the case and IAM strategy has had to evolve quickly to keep up. Explosion of machine identities. Most cloud environments today have many more service accounts, APIs and automated workflows than human users. AI agents are a whole new category. These systems usually need broad access to do their job and, thus, are an attractive target if left unmanaged. Remote and hybrid work eliminated the perimeter. As people log in from personal devices, home networks and shared spaces, identity has become the real security boundary. Multi-cloud creates a lot more complexity. Trying to manage a consistent access policy across AWS, Azure and Google Cloud at the same time is actually hard without a strong Identity and Access Management strategy. Credential theft is still the primary attack vector. “Once they have stolen or leaked credentials, they can walk through the front door. That’s exactly what strong identity controls are designed to prevent.” Human vs Non-Human Identities: What’s the Difference? Most people think of identity only as employees logging in. The truth is that modern Identity and Access Management has two very different categories to consider. Human Identity These are your employees, contractors and partners. They log in with user names and passwords and more and more with multi-factor authentication. Needs for access are usually fairly predictable and related to a particular role or department. Non-Human Identifiers These include service accounts, API keys, bots, containers, microservices, and even AI agents. Unlike humans, these identities often run continuously, operate at machine speed and have standing privileges that are never reviewed. Most organizations now have far more machine identities than human employees and that gap is growing every year. The problem is that many security teams still build their Identity and Access Management strategy around humans first, leaving non-human identities under-monitored and over-privileged. Cloud Identity Security Core Principles Whether the identities are human or non-human, there are a few foundational principles that are the basis of a strong identity governance program. Minimum Privilege Access Every identity, machine or human, should have the least amount of access necessary to do its job. Nothing else. Continuous Validation Access must never be a one-off check. It’s important to continuously check sessions and permissions for things like non-human identities that are operating 24/7. Scalable Identity Governance Every identity, whether it’s an employee or an automated script, should be tracked in one system, not in different tools. Top Level Authentication This principle uses multi-factor authentication for people, and short-lived, automatically rotated credentials for machines. Perform Periodic Access Reviews Permissions drift over time . Regular reviews of accounts will catch those with more access than they should have, human or otherwise. How to Implement Identity and Access Management in Cloud: 2 step by step A robust access control strategy can be put in place in time. Break it down into doable, clear steps. Step 1: Make a List of All Identities Begin with a catalog of all human users and all non-human identities in your cloud environment, including forgotten service accounts and orphaned API keys. Step 2: Enforce least privilege everywhere Check each identity and remove any excess permissions. Just this alone takes a big chunk out of your attack surface. Step 3: Bring identity management in-house Manage permissions from a single Identity and Access Management platform instead of managing permissions separately for AWS, Azure, and Google Cloud. Step 4: Implement Strong Authentication Require multi-factor authentication for all human users, and use short-lived, automatically rotated credentials for machine identities instead of static API keys. Step 5: Watch out for Non-Human Identities Treat service accounts and AI agents the same way you would treat human users. Watch what they do, notice anything strange, and lay down the law about what they can and cannot get into. Step 6: Automate Access Reviews Manual reviews can’t keep up with the speed of change in cloud environments. Automated tools can constantly flag excessive permissions and inactive accounts. Step 7: Configure Access Expiration Temporary access should really expire. One of the biggest risks in any identity governance program is one-time standing privileges that are never revisited. Step 8: Develop Your Team Even the best access management tools are worthless if the employees don’t understand the importance of access controls and how to comply. Identity & Access Management Risks

Advance Cloude Security

OSI Model Explained: A Complete Guide to All 7 Layers

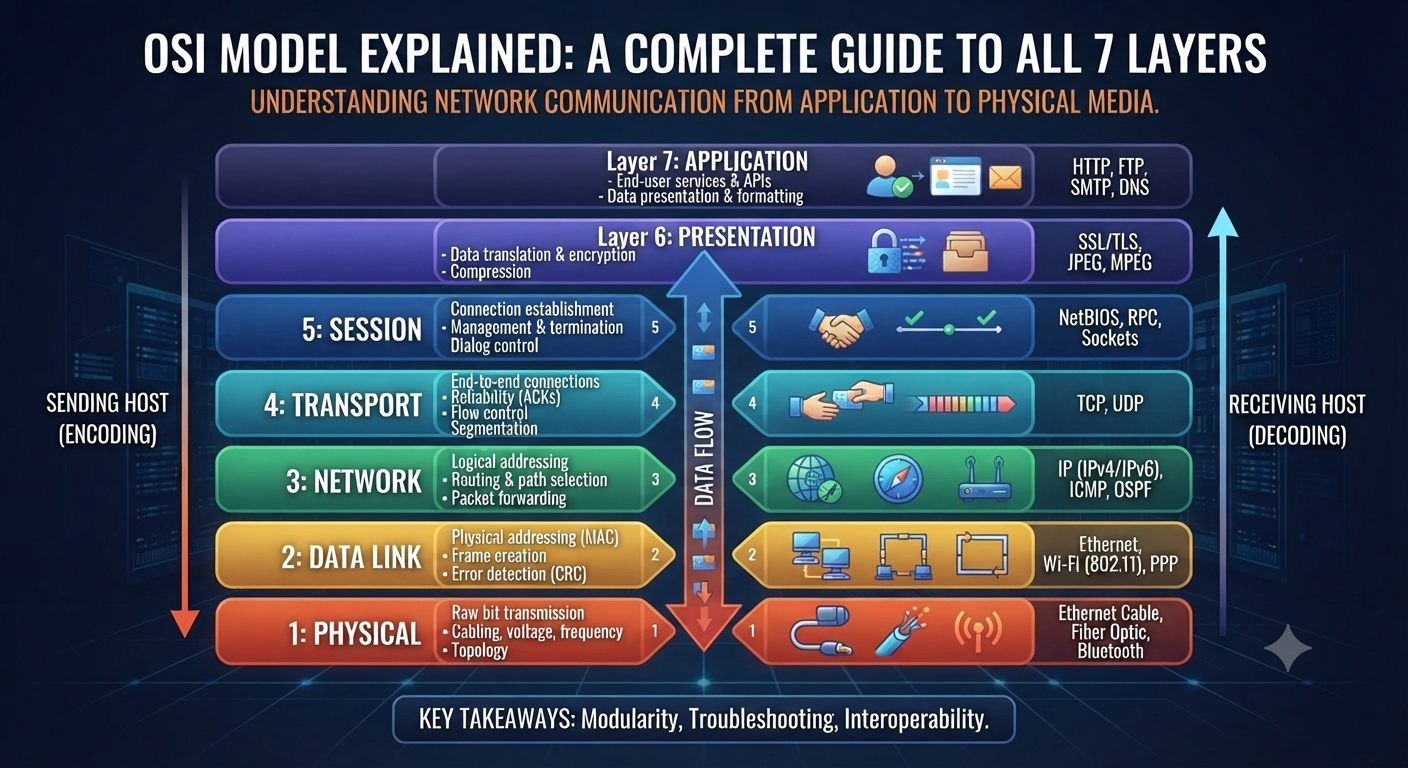
The OSI Model Explained: A Complete Guide to the 7 Layers   If you have started learning networking, then you would have heard about the OSI Model within the first few days. You’ll see it in every textbook, on every certification exam, and in almost every networking interview question. And with good reason: it’s the most useful mental model for understanding how data actually travels from one device to another. In this guide we’ll walk through this framework one layer at a time, explain why it still matters even though real-world networks don’t follow it exactly, and show you how to actually remember all seven layers without just memorizing a list. The OSI model is the Open Systems Interconnection model. The OSI Model, which stands for Open Systems Interconnection Model, is a conceptual model that standardizes the way in which various network protocols communicate and interact with one another. It breaks the whole process of network communication into 7 different layers . Each layer has a specific job . Think of it like a mail system . A letter passes through several stages before it arrives at its destination: it is written, put in an envelope, addressed, sorted and delivered. This is the same idea as the framework, except instead of a letter you have data moving across a network, and instead of a mail carrier each layer passes the data to the next. The International Organization for Standardization (ISO) developed it to give network engineers a common language and standard way to design and troubleshoot systems, no matter the vendor or technology used. Why the OSI Model Still Matters Today   Some students ask why they need to learn this framework, since real networks run on the simpler four-layer TCP/IP model. This is why it still deserves a place in every curriculum: It is the standard troubleshooting framework. When something goes wrong, network engineers will ask, “which layer is this happening at,” and that question alone quickly identifies the issue. It establishes a common language. It is this model that makes sense of terms like “Layer 2 switch” or “Layer 3 routing.” Engineers all over the world use the same reference points. It’s on all the major certifications. CCNA, Network+ and nearly every other entry-level IT exam tests your knowledge of it directly. It simplifies a very complicated thing. It’s much easier to learn than trying to understand everything at once when you break down the network communication to 7 more manageable parts. Although real hardware and software do not break down into exactly seven discrete layers, this model is still the best teaching tool in the industry for understanding how networks work. Understanding the 7 Layers of the OSI Model     As data is sent, it passes down through the layers. As data is received, it passes back up through the layers. Lets look at each layer from the one closest to the user. Layer 7 Application Layer This is the layer you actually work with. It includes the protocols that permit applications to communicate over a network, such as HTTP (web browsing), FTP (file transfers), and SMTP (email). This is the layer you are working at when you open a browser and load a website. Layer 6: The Presentation Layer This layer handles formatting, encryption, and compression so that data sent by one system is correctly understood by another. Basically it converts the data to a format that both sender and receiver understand . It also does some other stuff like SSL/TLS encryption . Layer 5: Session Layer It is responsible for the establishment, management and closure of communication sessions between two devices. It keeps track of whose turn it is to send data. It keeps sessions in sync, which is very important for things like video calls and long file transfers. Layer 4: Transport Layer This is where the data is reliably delivered. TCP and UDP are live protocols here. TCP ensures data arrives in the right order, but UDP sacrifices this guarantee for speed, which is why it’s used for live streaming and online gaming. Layer 3 Network Layer The Network Layer takes care of logical addressing and routing . It finds the best path for data to travel through multiple networks . It is responsible for getting data from one network to another . At this layer IP addresses and routers are used . Layer 2: Data Link Layer This layer is responsible for formatting data for transmission, and detecting errors, between two directly connected devices. MAC addresses and switches are found here and this layer is also where Ethernet frames are created. Layer 1: The Physical Layer Here’s the groundwork: real cables, network adapters, radio frequencies, electrical signals. This is simply the transmission of bits, ones and zeroes, over a physical medium. Remembering the Layers of the OSI Model     Most students use a mnemonic to cement the order in memory. One popular one going down from Layer 7 to Layer 1 is: “All People Seem To Need Data Processing” All = Application People = Presentation seem = session To = Transport Need = Network DataLink = Data Processing = Physical Choose your own poison or make your own. Whatever floats your boat. The exact wording of the mnemonic is much less important than the order. OSI Model vs TCP/IP Model: Significant Differences A lot of beginners get confused between these two so here is a clear side by side comparison. Factor TCP/IP Model This Framework Number of layers 4 layers 7 layers Origin ISO theoretical standard development Developed by the U.S. Department of Defense, based on actual protocols Usage Instruction and Troubleshooting Guide What real-world networks actually run Application, Presentation, Session Equivalent to Layer 7-5 Combined into a single Application layer Equivalent to Layer 4 Transport Transportation Equivalent of Layer 3 Network Internet Layer 2-1 equivalent Data Link, Physical Combined into one Network Access layer Real World Examples of OSI Model Knowing the layers in theory is one thing.

Devops

Types of Computer Networks Explained: LAN, WAN, MAN, and More

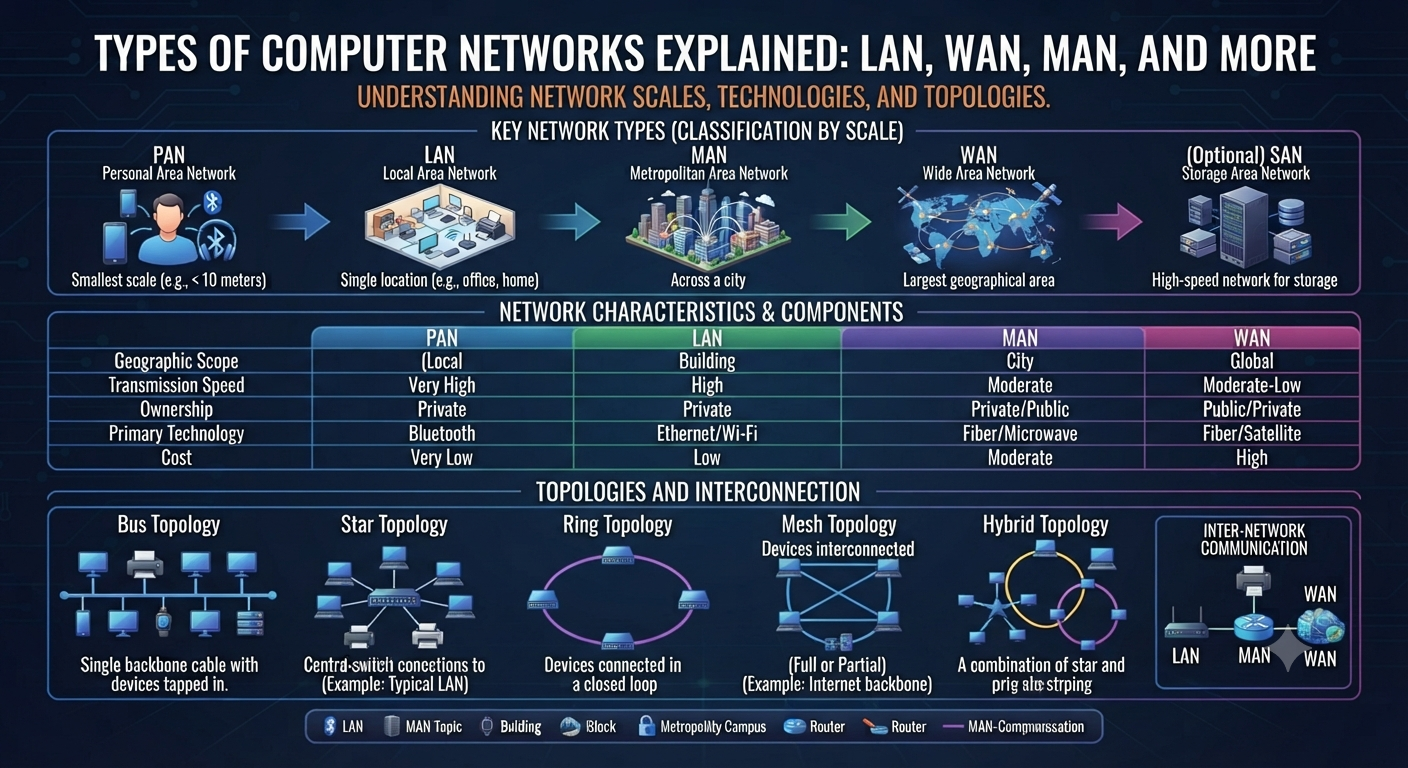
Computer Network Types LAN, WAN, MAN & Others Demystified If you are studying IT, preparing for a CCNA exam or just trying to understand how the internet actually connects your laptop to a server half way across the world, you have probably heard the term “network” a hundred times without a clear picture of what it means. This guide simplifies the major types of computer networks and explains them in plain language so that you walk away knowing exactly what a LAN, WAN, MAN and a few other network types are – and when each one is actually used. What is a network computer? A computer network is simply a group of two or more devices – computers, servers, printers, phones – that are interconnected so they can share data and resources. The connection can be a physical cable or a wireless signal, and it can be between one room or an entire continent. There are many different types of computer networks because “connecting devices” can mean very different things depending on the distance involved, the number of users, and the purpose. Both a home Wi-Fi setup and the network that runs a bank’s ATM system are networks, but they are built and maintained in very different ways. Why Knowing the Different Types of Computer Networks is Important     Knowing about the different types of computer networks isn’t just exam trivia — it’s the foundation of nearly every IT career path, from network administration to cybersecurity to cloud engineering. Certifications such as CCNA and CCNP directly test this knowledge, as every troubleshooting decision, every security policy, and every infrastructure design starts with knowing what kind of network you have. Main Types of Computer Networks Geographic size is the easiest way to understand the different types of computer networks, and computer networks are usually classified by geographic size. This is what you will most often see, from smallest to largest. Local Area Network (LAN) A LAN is a network confined to a small physical space such as a single office, a home, a school lab, or one floor of a building. This is the most common of all the types of computer networks, as almost every home and business has one. A LAN is a network owned and operated by one company or person, and it typically uses Wi-Fi or Ethernet connections. Because the devices are close together, such as sharing files between office computers or connecting to a local printer, LANs have very high speed and low latency. To set up a network you will typically need a router, a switch, and network cabling or a wireless access point. WAN Wide Area Network     A WAN connects devices over large geographical areas such as cities, countries, or continents. The biggest example of this type of network is the internet itself, but private companies also build their own wide area networks (WANs) to connect branch offices in different locations. Unlike a LAN, a WAN typically uses third-party infrastructure such as leased telecom lines, satellite links, or fiber-optic backbones since no single organization owns the cables stretching across entire countries. Speed and latency vary greatly depending on the type of connection. WANs also require more complex routing, security and management than a LAN. Of all computer network types, WANs are the type that enables remote work and worldwide business operations. MAN (Metropolitan Area Network) A MAN is somewhere in between a LAN and a WAN – it covers a city or a large campus, interconnecting multiple LANs in that area. City governments, multi-campus universities, and cable TV providers often use MANs to connect buildings without relying on the entire public internet. MANs are usually owned by one organization or an Internet service provider that provides metropolitan coverage. MANs use high speed fiber optic connections. It is not a very known member of the family of network types, but it has an important role in the urban infrastructure. PAN (Personal Area Network)     PANs are the smallest network, centering on a single person’s immediate devices — say, a phone and wireless earbuds, a smartwatch or a laptop connected over Bluetooth. Its range is usually only a few meters. Most modern scenarios have PANs that are wireless by default and is used all the time without people knowing that it is technically a network. CAN (Campus Area Network) A CAN links together many LANs over a small geographical area, such as a university or corporate campus, but not across a city like a MAN. It’s basically a bridge between LAN scale and MAN scale. It’s common for educational institutions where several buildings need to share resources like a central server or library database. SAN (Storage Area Network) * A SAN is a high-speed, special-purpose network that connects servers to storage devices that is independent of the normal data network. SANs are used by businesses for centrally storing data, backups and disaster recovery because they deliver fast access to data at the block level without slowing down the main network. WLAN (Wireless Local Area Networking) A WLAN is just a LAN that connects devices using wireless technology (Wi-Fi) instead of physical cables. The convenience of not having to run cables to each device has made the setup the default in homes, cafes and offices, although it usually sacrifices a bit of speed and security compared to a wired LAN. Difference Between LAN and WAN and MAN Feature LAN MAN WAN Coverage area Single building/room City-wide Country/global Ownership One organization Single entity and/or ISP Several providers Speed Very fast Fast Varies (often slower) Setup cost Low Medium High Example Office network City gov network The net Seeing these three types of networks together makes it easier to understand why organizations use different types of networks depending on how far their data needs to travel. Computer Network Types by Architecture Besides geographical classification, network types can also be classified by the way devices communicate with each other: Client-Server Network: Clients request resources from

Advance Cloude Security

IP Subnetting Made Simple: A Step-by-Step Guide for Beginners

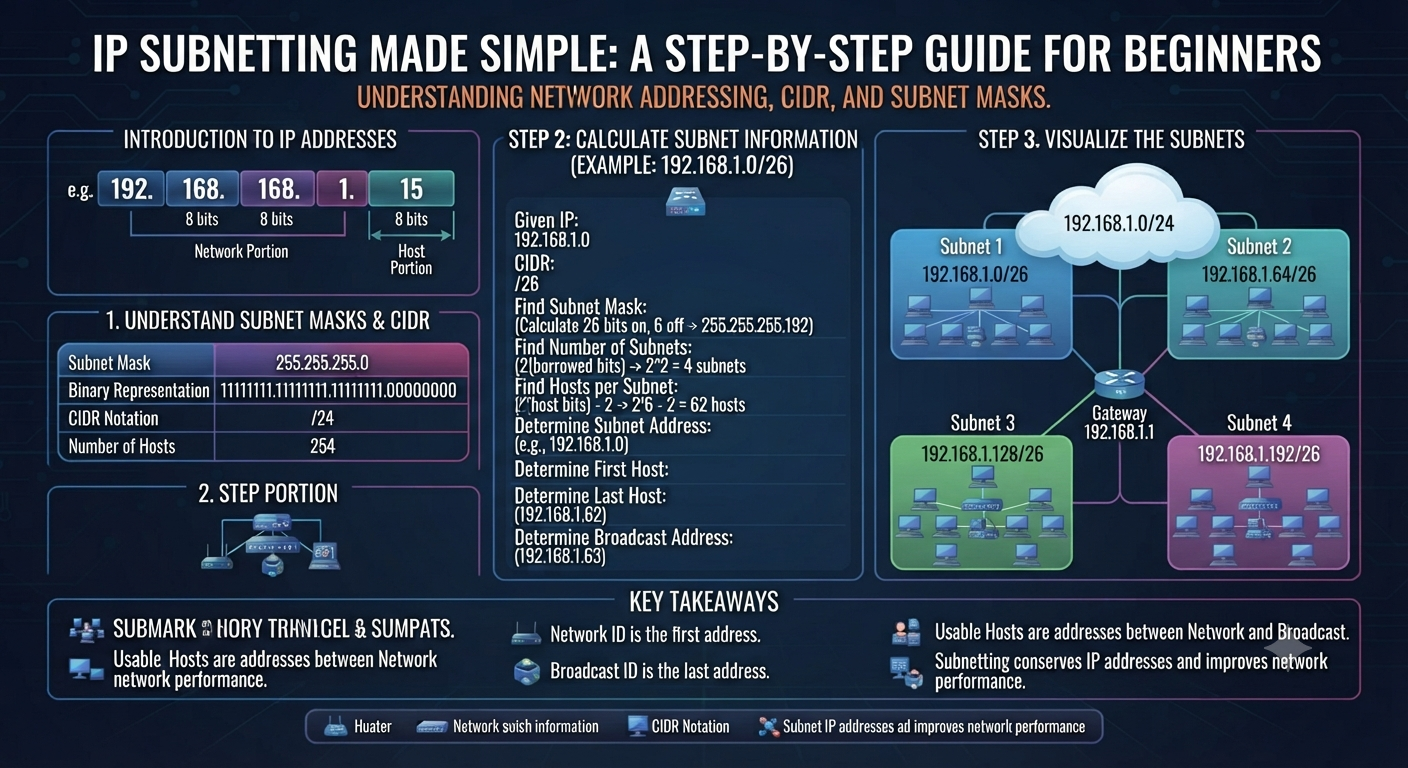
IP Subnetting Made Easy – A Novice’s Guide   If you have ever opened a networking textbook, and run into a wall of binary math on the first page about subnetting, you are not alone. IP subnetting is the networking topic that scares the bejeebies out of beginners. But it’s really pretty simple once someone explains it in plain English rather than pure math. This guide will take you step by step, and with a real world example, so you can calculate subnets with confidence for your CCNA studies or your first office network. What is IP Subnet? IP subnetting is the technique of dividing a large network into smaller, more manageable sub-networks called subnets. Instead of having all devices on one flat network, subnetting lets you carve up that address space into logical chunks – one for each department, floor or purpose. Picture a company building with an open floor plan, and then the same building with private offices. Both are the same size in terms of people but breaking it down into rooms makes it much easier to manage where people go, control traffic and keep things organised. That’s precisely what subnetting does for a network. The significance of IP subnetting in networking   Without subnetting, every device on a network is part of one big broadcast domain. As the number of devices on the network grows, this quickly becomes slow, messy, and insecure. Subnetting solves this by: Reduce network congestion by limiting broadcast traffic to smaller groups Improve security by isolating departments or types of devices from each other More efficient allocation of IP addresses and less waste of large address blocks Being able to localize problems to a particular subnet to aid troubleshooting This is one of the primary reasons why IP subnetting is one of the first practical skills tested in CCNA and other networking certifications – nearly all real-world network design decisions are based on it. Key terms you should know before There are some terms that come up over and over here, so it is helpful to define them clearly before we get into the steps: IP Address: A unique number assigned to each device connected to a computer network (e.g. 192.168.1.10) Subnet Mask: A number that divides the network part from the host part of an IP address (e.g. 255.255.255.0) CIDR Notation: A short form of a subnet mask, written as a slash followed by a number (e.g., /24) Network ID: Address that identifies the subnet, not a particular host Broadcast Address: This is the address used to send data to all devices on that subnet at once Host: Any device, such as a computer or printer, that has been assigned an IP address on the subnet How to Subnet IP Addresses (Step by Step) Here’s the real deal broken into five manageable steps. Step 1 — Know the IP Address Structure IPv4 address is 32 bits long, split into four groups known as octets (e.g. 192.168.1.10). Each octet can be from 0 to 255. An IP address is divided into two parts: the network part, which identifies the general network, and the host part, which identifies the particular device. Step 2 — Find the Subnet Mask The subnet mask tells you exactly where the network part ends and the host part begins. For example, a subnet mask of 255.255.255.0 (or /24 in CIDR notation) means that the first three octets are used for the network and the last octet is used for host addresses. This is the one number that the whole of every netting calculation is based on. Step 3 — Determine the Number of Subnets and Hosts Knowing the subnet mask, you can determine how many subnets and usable host addresses the subnet mask creates. The general formulas are Number of subnets = 2^ (borrowed bits) Usable hosts per subnet = 2^(remaining host bits) – 2 The “minus 2” is because of the network ID and the broadcast address which cannot be assigned to actual devices. This is where the bulk of the math anxiety actually happens. When you memorize the formula, it becomes rote. Step 4: Locate the Subnet Ranges Once you have worked out the number of subnets, you then need to work out the range of each subnet. This includes the network ID of the subnet, the usable IP range of the subnet, and the broadcast address of the subnet. It is this part of the process that makes the math practical to assign to devices in reality. Step 5. Assign IPs to Devices Then you assign individual IP addresses from the usable range of each subnet to devices, servers or interfaces, keeping the network ID and broadcast address free. This is where the entire subnetting process becomes a real working network design. Example Walkthrough of IP Subnetting   Let’s walk through a simple real example. Imagine you have the network 192.168.1.0/24 and want to cut it into 4 smaller subnets. A /24 network has 8 host bits (32-24=8). To make 4 subnets you need to borrow 2 bits (2^2 = 4 subnets), so the mask changes from /24 to /26. Your new subnet mask is 255.255.255.192. This gives you 4 subnets with 64 addresses ( 2^6 = 64 ) each. Each subnet has 62 usable host addresses (2 are reserved for the network ID and broadcast address). The four resulting subnets are: 192.168.1.0/26 (usable range .1 to .62) 192.168.1.64/26 (Usable range .65 – .126) 192.168.1.128/26 (usable range: .129 to .191) 192.168.1.192/26 (usable range .193 through .254) That’s the whole process in action — one network address turned into four independent, organized subnets, each of which can hold 62 devices. Top Mistakes to Avoid in IP Subnetting When learning this skill, beginners tend to make the same handful of errors: forgetting to subtract 2 hosts for network ID and broadcast address Mixing up subnet mask and default gateway – they are two totally different things Miscoding borrowed bits, affecting all subsequent calculations IP conflicts across